Grade Level
9 -10
minutes
15 min - 1 hr
subject
Earth Science
Activity Type:
building activity, model
Earthquakes are awe-inspiring. But the destruction, confusion, and injury associated with them often overshadow important classroom discussion about how these phenomena actually occur. By understanding what causes earthquakes, children can think critically about ways that scientists can work to prevent future damage from natural disasters.
In this activity your class will build and explore a mechanical model of a fault to learn how energy is stored elastically in rocks and released suddenly as an earthquake. This activity is part of a complete lesson plan with support materials available from the Incorporated Research Institutions for Seismology (IRIS).
Materials for One Earthquake Machine
- 2 – 4” x 4” wooden blocks cut from 2” x 4” scrap wood
- 1 – 4” x 36” sanding belt, 50 grit
- 1 – 1/3 Sheet of sandpaper, 60 grit
- 2 – Screw eye #12 x 1-3/16
- 1 – Bag of rubber bands, varying size
- 2 – Waxed cloth tape measures in both English and metric markings
*Two narrow <1″-wide metric-only measuring tapes can be substituted - 1 – Manila folder
- 1 – Roll duct tape
Tools
- Needle nose pliers
- Scissors
- Glue (white or contact cement)
- Pencil
- Staple gun
Construction
- Trace one of the 4” wood blocks on the back of the sandpaper, adding one inch to the length on one side. Use the scissors to cut out this rectangle.
- Place the sandpaper over one of the blocks and fold 1/2″ of the excess down over either side of the block.
- Using a staple gun, secure the excess sandpaper to the edges of the block. This is block A.
- Screw one 12 x 1-3/16 screw eye into a cut end of block A (sandpaper), about 1⁄2 inch from the base. (See figure below.)
- Screw one 12 x 1-3/16 screw eye into the second block, block B (no sandpaper). (See figure below.)

- Use the needle nose pliers to slightly open the eye of the screw eye in block A.
- Use the scissors to cut the sanding belt so it is no longer a loop.
- Use the scissors to cut the metal ends off one of the measuring tapes.
a. If your measuring tapes show both metric and English measures on one side, use the scissors to split the measuring tape (without the metal ends), leaving the metric markings intact.
b. Discard the half of the split measuring tape marked in inches.
- Thread 1⁄2” of the end of the split measuring tape through a rubber band, then fold that 1/2″ of measuring tape back on itself, around the rubber band.
- Use duct tape to secure the loop you made with the measuring tape in Step 9 so that the rubber band is attached to the end of the measuring tape.
Optional Building Addition:
- Cut four strips out of the manila folder: two that are 1⁄2” wide and 5” long (these will be a floor and roof), and two that are 1⁄2” wide and 12” long (these will be vertical walls).
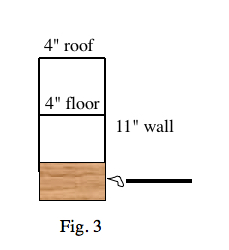
- Fold 1⁄2” of each end of the roof and tape each end to the top of a wall.
- Fold 1⁄2” of each end of the floor and tape it inside of the two walls, about halfway up the structure.
- Fold 1” of the bottom of each of the two walls, and tape it to the side of block A opposite to the one covered in sandpaper.
*Tip – This building can be a distraction for the students. Thus, it is best used for demonstration purposes.
Setting Up the Earthquake Machine for Use
- Smooth the sanding belt out on the lab table so that there are no waves in it. It helps to roll it backwards on itself to flatten it.
- Use duct tape to secure each end to the table, grit side up.
- Parallel to the sanding belt, tape down the uncut measuring tape in the same fashion as the sanding belt. (Be sure the metric side is up!)
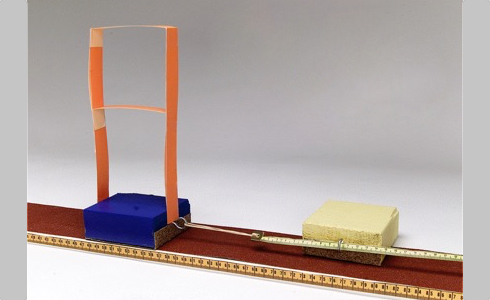
- Place block A, sandpaper side down, on one end of the sanding belt.
- Hook the rubber band that’s attached to the measuring tape to the screw eye.
- Thread the other end of the split measuring tape through the screw eye of block B, and move the block to the opposite end of the sanding belt. Block B will stand on its narrow edge with the screw eye over the center of the sanding belt. The screw eye in block B serves as a marker to allow you to measure the amount of measuring tape pulled through it. (See figure below.)
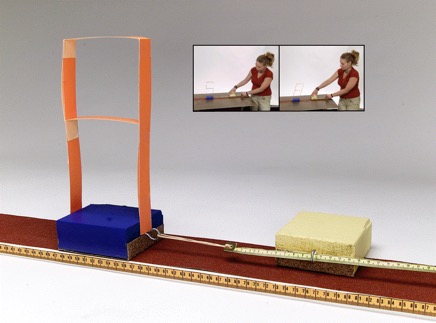
- Using a slow, steady pulling motion, pull the measuring tape through the eyelet on block B until block A moves at least 5 times.
*Note – If block A does not stick-slip you may need to daisy chain several rubber bands together)
Understanding the Model
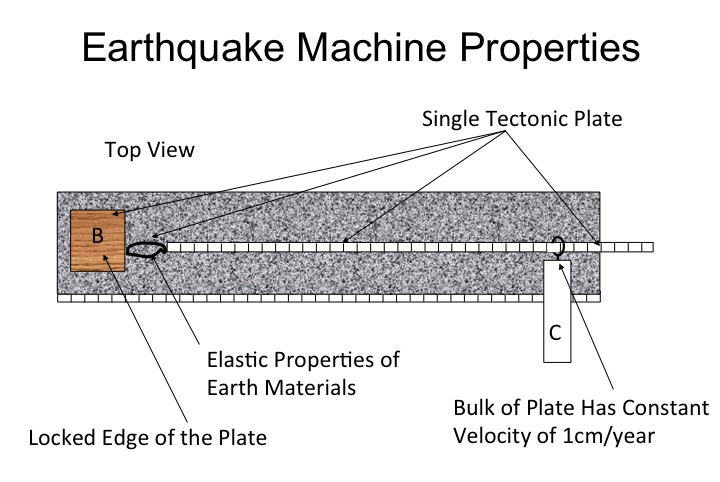
This model allows you to explore stick-slip behavior of some faults and to develop a more accurate definition of an earthquake and its causes. The wood block represents the active section of a fault, while the rubber band represents the elastic properties of the surrounding rock that store potential energy. Each time the block moves, you can see and feel the release of energy and propagation of seismic waves from the elastic source, which is the definition of an earthquake.
While this model accurately simulates the strain energy that slowly accumulates in rock surrounding a locked fault that is released in a sudden slip event—a process known as the Elastic Rebound Theory—it is ultimately a simplification of a complex earth system. Such simplifications must be understood to interpret the model accurately. The relationship between the model and reality should be clearly emphasized to students. For a more complete analysis of how this model is similar to and deviates from the natural system on which it is based consult the instructional guide.
Reflection:
- After using the Earthquake Machine model, describe what causes an earthquake.
- What did this model allow you to see that you don’t think you would be able to see if you were looking at a real fault?
- How might this model be both like and unlike an actual fault and earthquake?
- How would you modify the model so that it no longer stored energy? How do you think your modification would impact the model’s overall operation? What would happen if you could make the same modification to our Earth?
- What aspects of the model do you think could be “measured” quantitatively? Describe how we could do this.
- Predict what would occur if you opened an accelerometer app on your smart phone, placed the phone on the table near the sandpaper, and started to record just before using the model? What would you predict would happen if you moved the phone farther from the model? What if you placed it on the block?
This is an excerpt from the lesson plan “Defining An Earthquake” by Michael Hubenthal. You can view the complete teacher guide, lesson powerpoint, and extension activities and learn more about how this model can be used to calculate each earthquake’s magnitude here.

Incorporated Research Institutions for Seismology (IRIS, www.iris.edu) is a university consortium funded by the National Science Foundation to provide facilities for education and research in seismology. IRIS provides free educational activities and resources for K–16 students and teachers, and the general public. It operates global seismic networks, portable seismic instrumentation, and data access facilities.
More Seismology Teaching Resources from IRIS:
Exploring Plate Boundaries with Seismic Data
Meet the Writer

About Incorporated Research Institutions for Seismology
@IRIS_EPOIncorporated Research Institutions for Seismology (IRIS) programs contribute to scholarly research, education, earthquake hazard mitigation, tsunami warning, and to the monitoring of underground nuclear tests.