Activity Type:
Minerals are naturally occurring, non-living compounds of elements. They are the building blocks of rocks. Geologists are greatly interested in minerals because they can reveal an enormous amount about the history of the geologic environment in which they are found. For example, minerals rich in iron and magnesium are typically associated with volcanic processes. Geologists can classify and identify minerals by observing various properties such as streak, hardness, luster and, in some cases, fluorescence.
In this activity, students will examine 10 mineral specimens and explore the different properties that minerals exhibit. Students will record their observations on the samples’ properties of luster, streak, hardness and fluorescence and use these observations to identify the minerals.
Grade Level: 6th – 8th Grade
Subject Matter: Earth Science
National Standards: NS.5-8.1, NS.5-8.3
[attach rockstars]
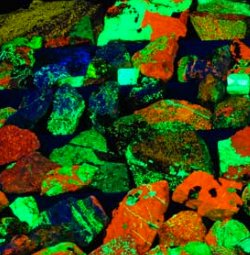
In 1968, the New Jersey Senate decreed the town of Franklin a geological wonder: “The Fluorescent Mineral Capital of the World.” Over 350 different minerals have been found in the area, 90 of which glow brilliantly under ultraviolet light. Franklin, NJ, boasts two mineral museums devoted to fluorescing rocks, the region's unusual geology and its zinc mining history.
Activity Materials
The following materials are available from Ward’s Scientific Supply Company – http://wardsci.com. In order to reduce costs, 1 – 2 sets of mineral specimens or materials can be purchased and set up as rotating group activities.
Mineral specimens needed:
Quartz
Plagioclase feldspar
Orthoclase feldspar
Calcite
Galena
Magnetite
Fluorite
Gypsum
Halite
Sulfur
Pyrite
Materials needed:
Streak plates – i.e., plain white porcelain plates without any glaze or enamel. Alternatively, you can use the back, unglazed sides of regular bathroom or kitchen tiles. You need one for each student or group of students.
Glass plates – a few centimeters thick to avoid breakage. If you don’t want to order them, you can find them in thrift shops or dollar stores. You need one for each student or group of students
Pennies – one for each student
Steel nails – one for each student
Magnifying lens – one for each student or group of students
One or two small hand-held ultraviolet lights that students can pass around.
One small bottle of correction fluid
One ultra-fine point permanent marker
Vocabulary
Mineral: non-living compounds of elements that are found only in nature.
Rock: a solid mixture of one or more minerals.
Crystal: a solid whose atoms are arranged in an orderly, repeating pattern.
Fluorescence: the emission of light by a substance that has absorbed light or other electromagnetic radiation of a different wavelength.
Luster: the manner in which a mineral shines or reflects light.
Streak: the color that a mineral leaves when rubbed across a porcelain plate, known as a streak plate.
Hardness: a measure of a mineral’s resistance to being scratched by a tool or another mineral.
What to Do:
Prep: Label each mineral according to the list below by applying a very small amount of correction fluid on the mineral first before using a permanent marker to label each mineral with the appropriate number. Use your copy of the Mineral Identification Workshop to keep this list as your answer key for the end of the activity.
1 – Pyrite
2 – Galena
3 – Calcite
4 – Fluorite
5 – Sulfur
6 – Magnetite
7 – Plagioclase feldspar
8 – Orthoclase feldspar
9 – Gypsum
10 – Halite
Recommendation: Set up workstations or divide students into groups, based on the number of sets of mineral specimens available.
1. Begin the lesson by having the students watch the Science Friday Video, “Rock Stars.” Discuss with students what they know about rocks and minerals. Review the definitions of and differences between rocks and minerals.
2. Inform students that they are going to explore minerals by observing the properties of 10 common minerals. Based on their observations, students will attempt to identify each mineral.
3. Inform students that in the process of identifying the minerals, they will be observing four main properties (luster, streak, hardness, and fluorescence) of each specimen. Review the following properties and instructions with students:
-
Luster is the way that a mineral reflects light or shines. If a mineral shines like metal, then the mineral is said to have a metallic luster. If a mineral does not shine like metal, it is said to have a non-metallic luster. Record metallic or non-metallic luster for each mineral.
-
Streak is the color of a mineral in its powdered form. To observe this characteristic, rub the mineral across the streak or porcelain plate, and observe the color left behind. Record the color of each mineral.
-
Hardness is the measure of a mineral’s resistance to being scratched. To test how hard a given mineral is, scratch a common item (e.g., glass plate, fingernail, steel nail, or penny) against the mineral. Then scratch the mineral against the common item. Record which item gets scratched by the mineral.
-
Fluorescence is a mineral’s ability to glow under ultraviolet light. To perform this test, hold the mineral under a small ultraviolet light lamp. Record if the mineral glows and the color of the glow for each mineral.
4. Have students rotate among the materials and mineral specimens to observe and record the properties of each of the minerals. Make sure students are recording their observations specifically for the mineral that they are examining.
5. Once observations are completed, have students compare and contrast their observations. Were they surprised by any of the results? If so, why? Did they observe any properties that were not expected? How could these properties help them tell apart different minerals. Invite students to create a “guidebook” of the different minerals they observed, with clues for helping amateur geologists tell them apart based on the properties they observed.
What’s Happening?
Minerals have many different physical properties. Scientists use these properties to help them classify and identify minerals. In this activity, students focus on observing four simple properties of minerals – luster, streak, hardness, and fluorescence.
Luster indicates how much light is reflected from a mineral’s surface. An example of a mineral with metallic luster is pyrite, which shines like gold metal. An example of a mineral that has a non-metallic luster is quartz, which resembles an ordinary piece of glass.
Streak refers to the color that a mineral leaves in a powdered form; it indicates the true color of the mineral. For example, the mineral pyrite may appear yellow to the eye. But when rubbed on a white porcelain plate (called a streak plate), pyrite leaves a black streak. Identifying a mineral by its streak is a much more accurate method than identifying a mineral by its color to the eye.
Hardness is a measure of a mineral’s resistance to being scratched. Scientists use a numeric scale (called the Mohs scale) of one to 10 to classify minerals by hardness. For example, the softest mineral, talc, rates as one and the hardest mineral, diamond, rates as 10.
Fluorescence is a mineral’s ability to glow when exposed to ultraviolent light. This happens when the chemicals within the mineral react in response to the ultraviolet light. Some common minerals that are known to fluoresce are calcite and willemite. Respectively, these minerals fluoresce reddish-orange and green. In mines or caves, fluorescence can be used to detect certain mineral deposits.
Topics for Science Class Discussion
• What are some uses of minerals? What are some advantages and disadvantages of using minerals?
• How are crystals and minerals related?
• What are the differences between fluorescent rocks and phosphorescent rocks?
Extended Activities and Links
Extend the activity by having students use other tools to observe additional properties. For example, they can use magnets to determine which minerals are magnetic, or drops of vinegar to observe which minerals effervesce in reaction to the acid in vinegar. Students also can classify minerals based on their smell and weight.
Have students go on a rock collection hunt in their surrounding neighborhood. Students can observe properties, identify rocks or minerals and present their findings to the class.
Conduct an interactive virtual lab on minerals:
http://glencoe.mcgraw-hill.com/sites/0078778026/student_view0/unit1/chapter3/virtual_lab.html
View an online guide to rocks, minerals, and gemstones: http://www.minerals.net/
Explore mineral-related activities online:
http://www.sdnhm.org/kids/minerals/index.html
View a fluorescent-mineral photo gallery:
http://users.ece.gatech.edu/~hamblen/uvminerals/
Research other places in the United States besides Franklin, NJ, where fluorescent minerals are found. What kind of minerals are they?
Consider a student field trip to see minerals. Find out if your local science or natural history museum has a mineral collection. For example, if you live in the New York metropolitan area or Connecticut, there are spectacular collections at New York City’s American Museum of Natural History and the Yale Peabody Museum of Natural History in New Haven, CT. If you live in Arizona, consider taking students to the annual Tucson Gem and Mineral Show in February.
This lesson plan was created by the New York Hall of Science in collaboration with Science Friday as part of Teachers Talking Science, an online resource for teachers, homeschoolers, and parents to produce free materials based on very popular SciFri Videos to help in the classroom or around the kitchen table.

The New York Hall of Science is a science museum located in the New York City borough of Queens. NYSCI is New York City's only hands-on science and technology center, with more than 400 hands-on exhibits explore biology, chemistry, and physics.