Grade Level
6 - 8
minutes
1- 2 hrs
subject
Computer Science
stem practices
Developing and Using Models, Mathematics and Computational Thinking
Activity Type:
coding, machine learning, artificial intelligence, Computer Science
 In this activity, you will learn to program an interactive game that responds to hand gestures and apply that knowledge to develop your own interactive game. Then you will engage in a design challenge to create unique game elements, explore the potential of AI in gaming, and gain a deeper understanding of how AI works. Get ready to discover the amazing possibilities of AI!

A Machine Learning Model For Hand Detection
Hand detection is the process a computer uses to identify a hand from an image. It’s important in various fields, like robotics, computer vision, and human-computer interaction. Accurate hand detection models are necessary to enable machines to interact with humans effectively. With the advent of learning-based methods, hand detection models have become more robust and accurate, making them suitable for real-life applications.
For example, hand detection models can be used for gesture recognition systems like SignAll, which uses computer vision to recognize and translate American sign language into text or speech. Its machine learning models are trained to recognize different sign language gestures, which can help people who are deaf or hard of hearing communicate with others who do not know sign language.
How Does Computer Vision Work?
SignAll’s core technology uses visual information, like images and video, and converts that information into data that can be processed by the computer.
- The input can be collected through one or more cameras.
- The quality of the images and video provided determines how well the app works. The better the picture, the better the result.
Sign language is an expressive, visual language, so it can be challenging for traditional technology to interpret. With SignAll, the camera on a phone or computer is used to capture, analyze, and translate the core elements of sign language.
- The shape, orientation, movement, and location of the hands convey important information during sign language.
- The body movements used by the signer are important markers too.
- Expressions of the face including the eyes, mouth, and eyebrows, and/or head movements such as nodding or shaking all provide meaning too.
All these elements are cataloged and interpreted by the computer software, allowing it to understand the sign language of the user. As the app collects this visual information, it compares it against a database of thousands of potential sign language gestures. It uses machine learning to narrow down the possibilities and predict the most likely options. The app presents those options to the user and they select the option that matches what they were trying to say.
Machine learning can be a powerful tool to address communication challenges for deaf and hard-of-hearing people. People who are deaf or hard of hearing often experience communication barriers when signing with members of the hearing community. AI can help overcome these barriers by developing technological solutions that allow deaf and hard-of-hearing people to communicate with others spontaneously and effectively, anytime, anywhere.
Now that you know how SignAll works, think about these questions:
- What problems would you solve with this kind of technology?
- How can you use hand or face detection with AI to make something new?
If you could take this technology a step further, what would that look like? Let’s find out!
Materials
- A computer with a camera
- Internet access
- Code files
Activity 1: Get To Know The PoseBlocks Platform
In this activity, you’re going to take the ideas behind the SignAll app and simplify them to create an interactive game that recognizes hand motions and reacts to them. You will move your hand around the screen as you try to touch randomly appearing objects. The camera on your computer will watch where your hand moves and its artificial intelligence will track and understand your movement.
You may want to work with a partner or a group on this project so that you have friends to help brainstorm ideas, offer feedback, and debug your code. You don’t need any prior knowledge of AI or machine learning to do this activity.
For this project, you’ll be using the PoseBlocks Software by MIT. This free toolkit uses drag-and-drop blocks to create code, a lot like the popular Scratch coding language. The difference between them is that PoseBlocks has special blocks to use built-in body-tracking artificial intelligence.
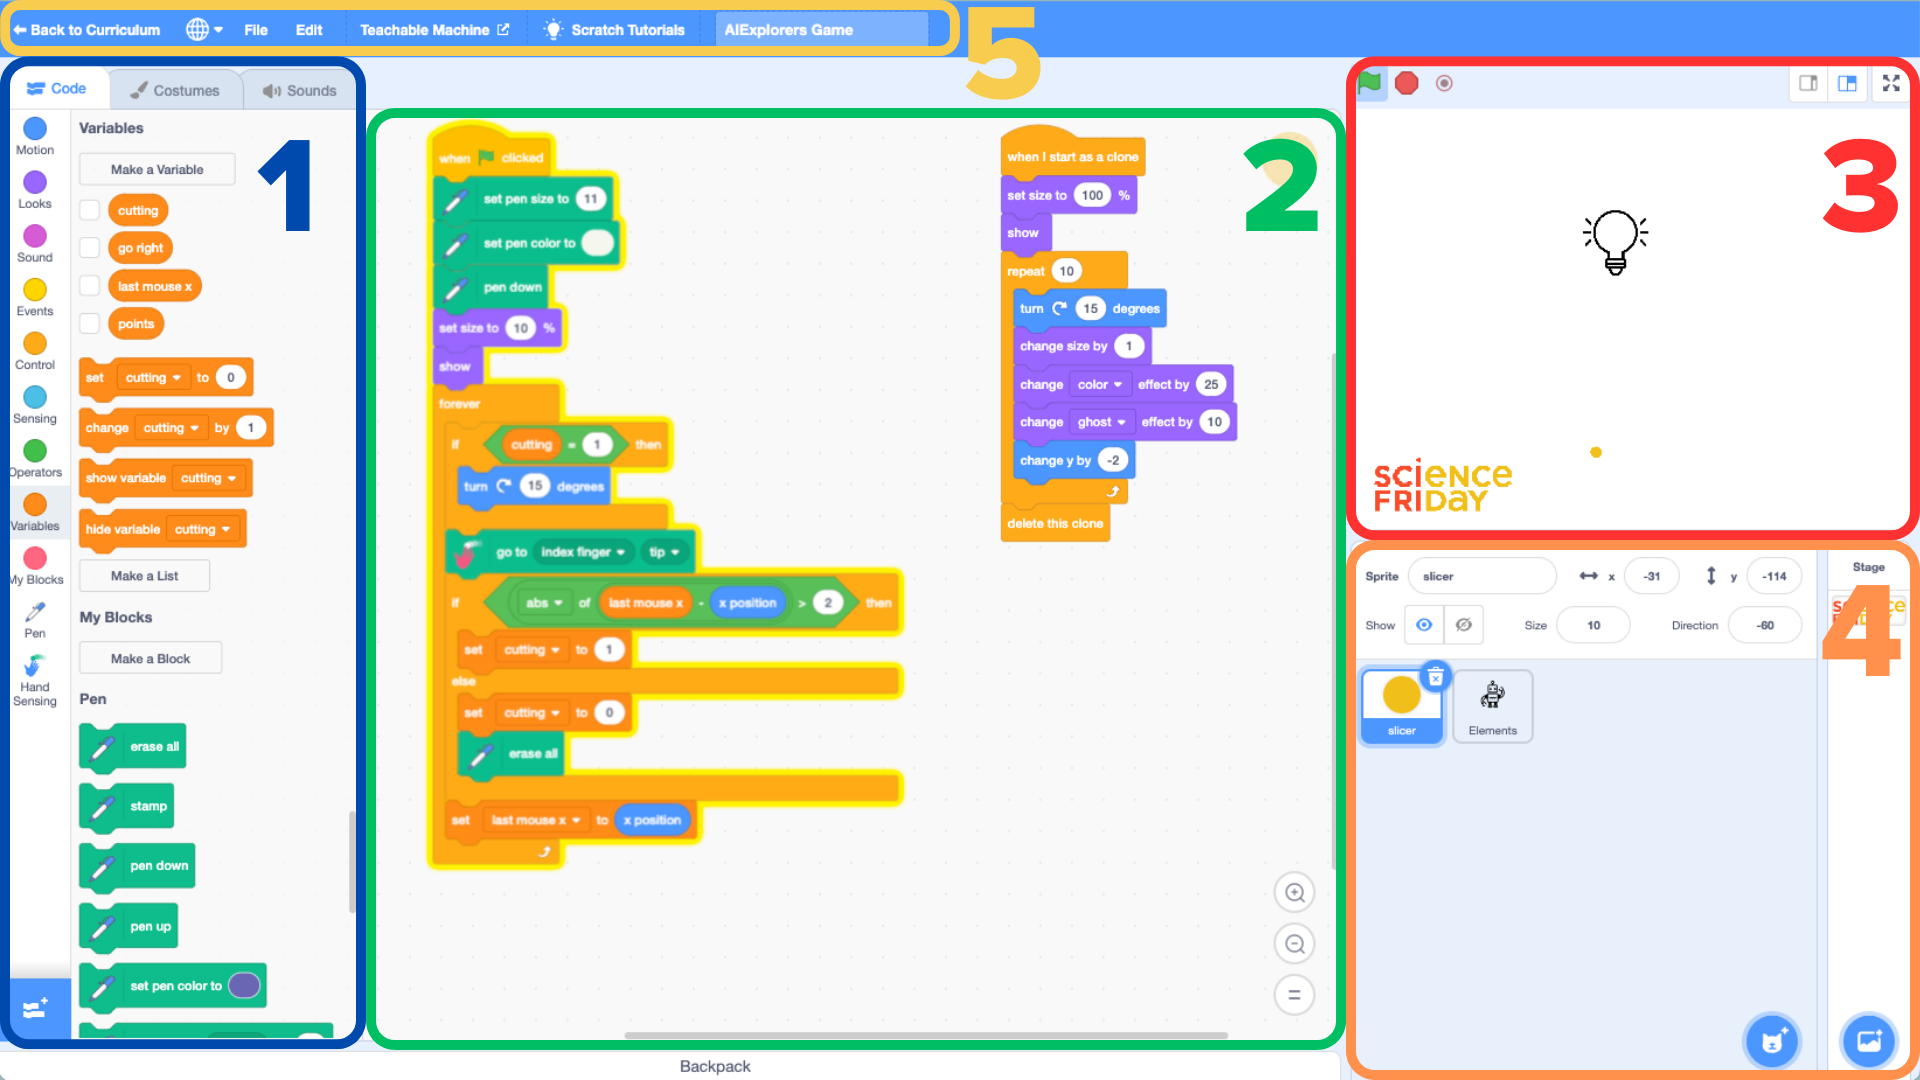
To create your code, you will click on the slicer sprite and drag blocks into the workspace. The PoseBlock workspace has several sections. (If you’re familiar with Scratch, this will seem very familiar.)
The area on the left has three tabs labeled “Code,” “Costumes,” and “Sounds,” each of which includes a library of items you can use. All the code blocks are in the code library, where they are grouped by function and color-coded. The costumes library allows you to add, change, or draw sprites. “Sprite” is the name for an object or character in PoseBlock. Each sprite can be given code to do something in your program. When a sprite has multiple forms, we call them costumes. For example, the elements sprite has nine costumes. Click on the “Costumes” tab to see them. (You can use any sprite you like. You can even draw your own.)
The sounds library allows you to add or record sounds. The Code Area in the middle is where you will drag your code blocks and click them together to make your game. On the top right is the Stage. This is where you can see the sprite perform the actions you code. The green flag starts the game. The red sign stops it. Below that is the Sprite Pane. This panel is where you can select sprites to code and adjust some settings for sprites. You can also select a custom Backdrop. Along the top is the Toolbar. That’s where you can load sample code and give your project a name. Also note, you can click the “Globe” 🌐 to adjust the language used. There are over 70 available.
To get you started quickly on this project, a special directory of samples has been created. In the directory, you’ll find three files: Game, Tutorial, and Game Graphics.
The complete code, ready to play, is in the “Game” file. To use it, download the file to your computer. Then in PoseBlocks, select “File” from the Toolbar, and choose “Load from your computer.” If you like, you can immediately start remixing the game code and customizing your game. Jump to “Activity 3: Customize Your Interactive Game“ to get some ideas and inspiration. If you want to learn about the coding that makes this game work, continue to “Activity 2: Create And Code Your Game“ to build the game, step-by-step.
Before you move on, there are few other items in the directory you may be interested in. The “Tutorial” file has all the individual code blocks used in the game. You can download this file to your computer and load it to Poseblocks just as you did the Game file. If you’d prefer not to have to search for each block while coding, this will help. It may make the programming process faster and easier, while still giving you the opportunity to go through the steps. (Hint: Teachers, PNG versions of the code blocks are also available. They are great if you are teaching on a smart board, or want to add them to a presentation.)
Finally, the file called “Game Graphics” contains the sprites used in the game as PNG files so that you can edit them, upload just the ones you like, or use them in other creative ways. You can also download this file, which will upload all the sprites to PoseBlocks all at once.
Activity 2: Create And Code Your Game
You will start by coding the “slicer” sprite. Click on the blue cat icon at the bottom of the Sprite Panel, then pick the “paint” option. In the Costume window that opens, make a yellow dot (or whatever shape you like). Name it “slicer.” You can get rid of any other sprites by clicking on the “x” in the Sprite Panel. This dot will move around with your finger, so you can track your progress on the screen.
Coding The Slicer Sprite
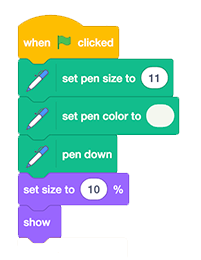
For this game, you will use a special feature called a pen, which allows the sprite to draw shapes on the screen. To tell the pen what to do you need some code blocks. Find the “when green flag clicked” block. This will tell the game to start. Drag it from the code library into the code area. Next, you want to set the pen size to 11, make the color white, and activate it. Find the “set pen size,” “set pen color” and “pen down” blocks in the code library and drag them to the code area, too. Finally, add the “set size.” Set the size of the object to 10 percent and display it using the “show” block. This will also help you track the movement of your finger on the screen. Remember you can change any of the settings if you like. If you prefer a purple pen line, go for it!
The next step is to create a forever loop and put a condition inside it that checks the value of the “cutting” variable. When your fingertip “touches” one of the random items on the screen, the slicer sprite “cuts” it, making it disappear. The cutting variable not only rotates the sprite by 15 degrees when it intersects with an object but also changes the figure of the sprite itself. This feature adds a visually engaging element to the gameplay experience, enhancing the aesthetics of the game.
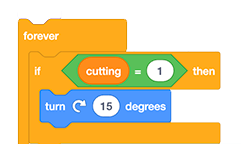
Since this is an action that you want to have happen over and over again, you need a special block. A loop is an instruction for the computer that repeats—in this case forever. Drag the “forever” block on the code area and add it to the blocks of your code. Anything inside that loop will continue to happen for as long as the game is running.
A variable is a value that can change depending on what information it receives. To create a variable, click on the “Variables” section of the code library and select “Make a Variable.” Make a variable called “cutting.” In this case, if the variable cutting is equal to 1, then the pen will turn by 15 degrees, as part of the movement of the game, and visual reaction of the cut, this when our fingers touch any of the elements on the screen, to make them disappear. Add an “If-then” block with a condition that uses an operator block to check the value of the cutting variable.

It’s time to activate the AI! Add the “go to” block to the end of your code and select “index finger” and “tip.” Your code will detect the location of your hand, specifically the tip of your index finger.
Next, you have a condition that takes the absolute value of an operation. The operation tracks the coordinates of your fingertip on the screen. The “X” value represents your finger’s horizontal position. In this operation, you will calculate the difference between the current—”x position”—and previous X position “last mouse x”—and make sure that difference is a positive number (abs). If the difference is bigger than 2, it means the object has moved a lot from its original position. The computer can make this calculation very, very quickly. Use the “if-then-else” block to help the computer make this decision. Note also that you will need to make the variable “last mouse x.”
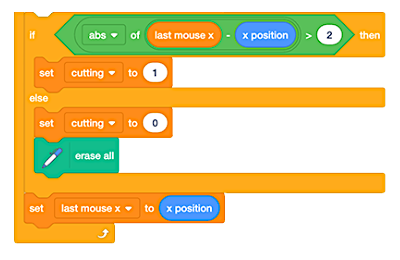
If your hand is moving fast, then the variable “cutting” is set to 1, which will cause the pen to turn 15 degrees, so that the line is visibly drawn. If the difference between past and present pen positions is small, then “cutting” is set to 0. Since you are not moving, the pen does not need to turn and all its marks are erased. For the purpose of the game, when you aren’t moving your finger, the computer will assume you have touched
The last step is to set the last mouse x variable to match the X coordinates of the current position of your finger. Then the process loops and starts all over again.
After you’ve completed these steps, all the blocks should look like this.
Create A Slicer Clone
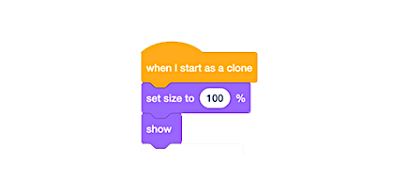
Now you’ll address the second part of the slicer code. The goal here is to create a clone, or copy of the original sprite. The clone’s job is to do something cool right after we perform a cutting action in the game—when your fingertip touches an object and makes it disappear. The slicer sprite will display a flashing animation, adding fun and more interaction to the game.
To define a clone, first set the size of the object to 100 percent, and display it.
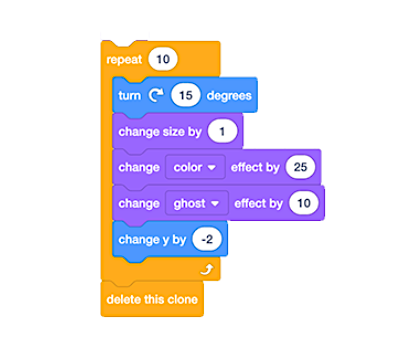
Then create a loop that will repeat 10 times. Set your code to rotate 15 degrees, resize by 1, and add a color effect and a fade effect. Change the position in Y to -2. This will create a colorful flashing effect when our fingertip touches one of the graphic elements in the game. Finally, add “delete the clone” when the animation is done. Play with the settings to create just the type of flashing animation you like!
Add Elements Sprites To The Game
Now, you will code the “elements” sprites. These images will randomly appear and move across the screen in the game. You will need to “touch” them with your fingertip, which will trigger the slicer animation you made in the first step.
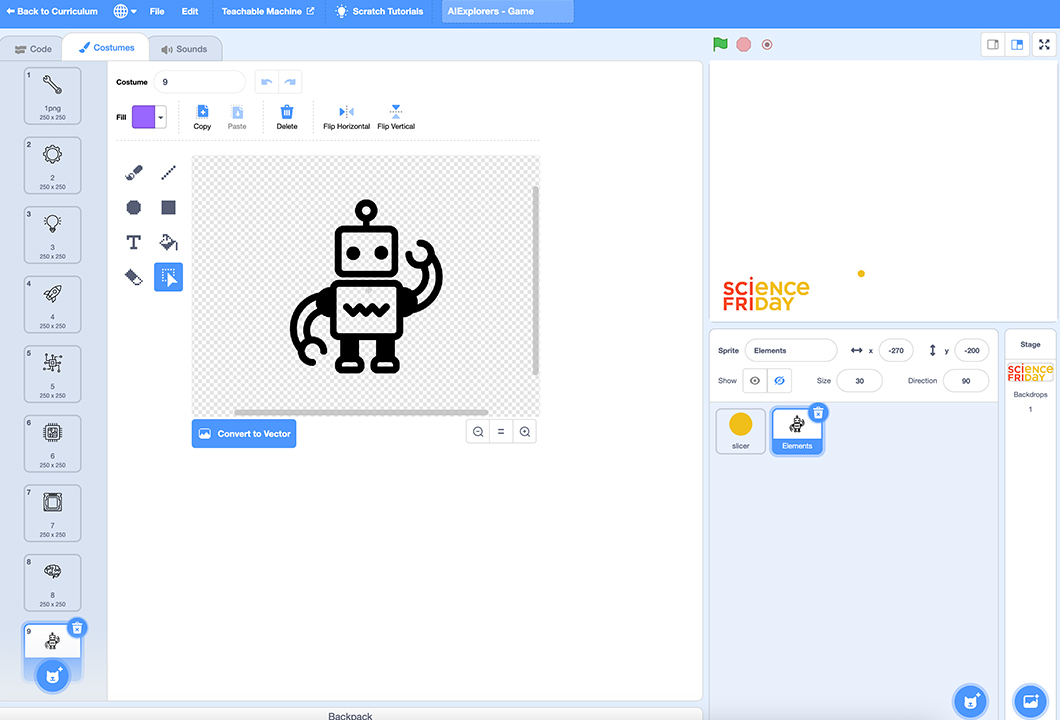

Once again you need to add a new sprite, just as you did before. It will be called “elements.” However, this time, you want to have several different objects that can appear. Use the game graphics provided (see “Activity 1: Get to Know the PoseBlock Platform”), draw your own, or select sprites from the library. Click on the Costumes tab to see them. The most important thing is that every object must be a costume under the same “elements” sprite, as shown.
Click on the elements sprite to add a block to the Code workspace. When starting the game (clicking the green flag), hide the object and create a loop forever. Inside the loop, create a clone of “myself” by clicking on the downward arrow. Then add the wait block and set it for one to two seconds. This will generate a sprite at a random time between one and two seconds, so that you can’t guess when it will appear. This will continue for as long as the game is running.
Make The Elements Sprites Move
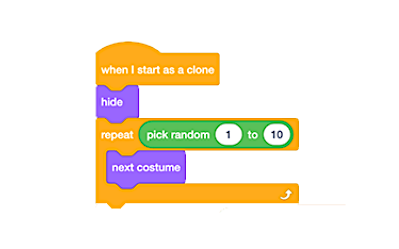
Once the clone is created, we want to select a random element sprite costume. Use the “When I start as a clone” block to begin the code. Then add a hidden block and a repeat loop. Add the “next costume” block to the loop and have it randomly pick a number from 1-10 using an operator block. This will randomize which elements sprite costume will pop up.
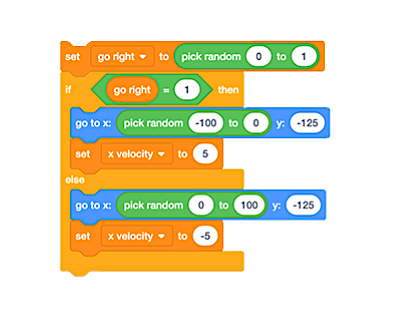
Now we need to give our elements something to do on screen. Add a variable and set it to “go right.” Use the same randomized code to set the variable to a random value between 1 and 0. Depending on the value, the elements sprite will move to the right or to the left on the screen.
With the help of the “X velocity” variable, a positive value makes it move in one direction (right), while a negative value makes it move in the opposite (left). The value of the velocity determines the object’s speed. Essentially, the velocity variable lets us control how the object moves within the game. Try changing the values to see how it affects the movement of the elements.
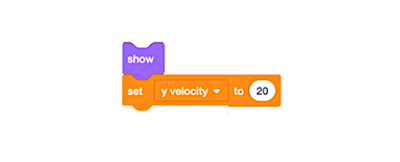
You also need the element to show up on screen. Use the “show” block to do this. Set the velocity (speed) variable to 20 in the Y direction—which controls movement up and down—by creating a “Y velocity” variable.
Now you need to code what happens to the elements sprite when it meets the slicer. Within a forever loop, change the Y velocity variable by -1. Change the position of Y by the variable “Y velocity,” and do the same with the position in X. This will cause the element sprite to randomly pop up from the bottom of the Stage and then drop again. Then, create a condition that checks if the element sprite touches the border of the Stage. If it does, delete that clone.
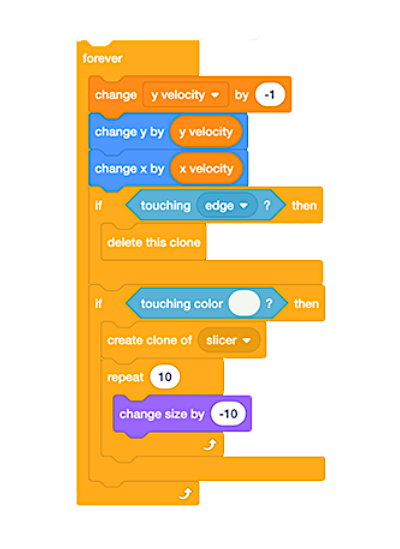
Next, create a condition so that when the element sprite is touched by your finger—the white colored pen of the slicer spite—a clone of the slicer is made. This will park the animation we coded previously. Finally, add a repeat loop and set the “change the size” block to -10. This will cause the element sprite to shrink until it’s very tiny.
After you’ve completed these steps, all the blocks should look like this.
This is a good time to save your game. Unfortunately, PoseBlocks does not have a way to save and share your program online between sessions. Instead, you will need to save the file. In the toolbar, enter the name of your game in the white box. Then click on “File” and select “Save to your computer.” To work on the game another time, just load the game file to PoseBlock in the same you did to upload other files as described in Activity 1. Be sure to save after each session. You can send your game files to anyone, so they can play as well!
Ready? Now it’s time to test your game!
Activity 3: Customize Your Interactive Game
Now that you’ve seen the basic game, think about ways to adapt it. You can change the sprites, play with changing the timing and movement blocks, adjust the animation of the slicer sprite, or even add sounds. You can change blocks and try new things. If something goes wrong, you can always undo it!
When you’re ready to make your own game, ask yourself these questions.
- What cool stuff can we add to make the game more fun?
- How can we make the game more exciting or challenging?
- How can we make the game easier to play for everyone? Can we make the game more fun to play with friends?
- What can we do to make the game look better?
- How can we make the game teach us something?
- What can we do to make the game more interactive?
- How can we change the game’s dynamics to make it more interesting?
Once you’ve made your game, give it a name and save your work. Have others try your game and get feedback. Play the games others made. Discuss what challenges you faced, and how you overcame them.
Take It Further
Did you enjoy using PoseBlocks to make an interactive game? The fun doesn’t have to stop there!
- Check out other PoseBlock projects for inspiration. What are other ways you can use this coding software to make something new?
- Go beyond visual interpretation! Teachable Machine has tools that will let you teach your computer using images or sounds. Here are some examples:
- Create your own unique set of gestures, and use them to control a game.
- Train a model in Teachable Machine to identify different voice commands, and use them to interact with a virtual character or control elements in a game.
- Create a sound classifier using Teachable Machine. Train the model to identify different sounds or environmental noises, and build an application that reacts to specific sounds. For example, you could develop a game that triggers events based on recognized sound patterns.
- Train Teachable Machine to identify various types of food based on images. Challenge users to develop an app that assists in recognizing dishes or ingredients to provide recipe suggestions or dietary information.
- Train to recognize different plant species from images, which helps users identify plants and provides care tips or information about each species.
- Use Teachable Machine to detect and analyze different postures and body positions, and build a game where players must replicate specific postures within a given time or solve posture-related puzzles.
Next Generation Science Standards (NGSS)
- MS-ETS1-2: Evaluate competing design solutions using a systematic process to determine how well they meet the criteria and constraints of the problem.
- MS-ETS1-3: Analyze data from tests to determine similarities and differences among several design solutions to identify the best characteristics of each that can be combined into a new solution to better meet the criteria for success.
Credits
Lesson and supplements by Camila Luna and Diego Luna.
Copyediting by Lois Parshley.
Digital Production by Sandy Roberts.
Educator's Toolbox
Meet the Writer
About Camila and Diego Luna
@MoonMakersCamila and Diego are the founding members of MoonMakers, a community of creators passionate about knowledge. They host a Makerspace, an open space with different digital manufacturing machines, and a YouTube channel where they promote science, technology, and the maker movement. They have collaborated to create educational content with companies such as Sesame Stree and Make: Community in the U.S. and Educational Television and Fundación Televisa in Mexico. Camila also teaches workshops throughout the Mexican Republic with Talent Land, the Secretary of Education in Jalisco, Conacyt, Centro Cultural España.