Grade Level
All
minutes
15 min - 1 hr
subject
Earth Science
stem practices
Developing and Using Models
Activity Type:
After School Activity, space, Family activity, STEAM
This activity is part of the Science Friday Sun Camp collection!
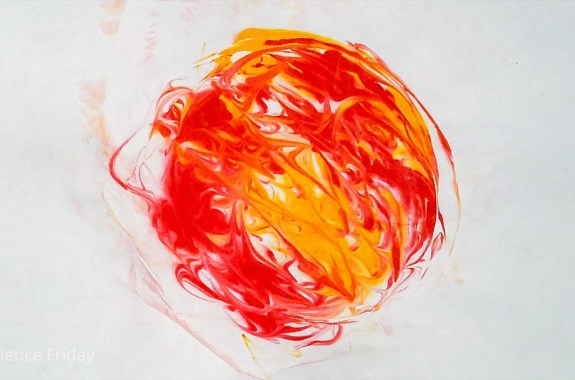
Since you can’t visit the Sun right now—it is about 93 million miles away after all—you need to rely on pictures taken by telescopes and probes to get an idea of what the Sun looks like. As a scientist, you can use your powers of observation to create a model of the Sun. A model is a copy of something. Models make it easier to share and investigate things that are far away or that are very, very big or very, very small. In this activity, you’ll make a swirling model of the surface of the Sun using shaving cream and food dye. So, what does that Sun look like, up close?
Can’t wait to get started? Jump to the experiment!
The Sun 101
The Sun is much more than a glowing light in the sky. The Sun is not solid; it’s a massive body of different plasmas, incredibly hot, electrically-charged gasses (mostly hydrogen) that emit light and flow continuously across the surface of the Sun. The surface of the Sun constantly changes and moves as the gasses twist and swirl, creating tangled magnetic fields, large sprays of plasma, and dark patches called sunspots. These changes on the surface of the Sun are called solar activity. There are times when the Sun is very active (during “solar maximum”) and times when it changes very little (solar minimum). That pattern, as the activity rises and falls, is the Sun’s solar cycle which takes about 11 years per cycle.
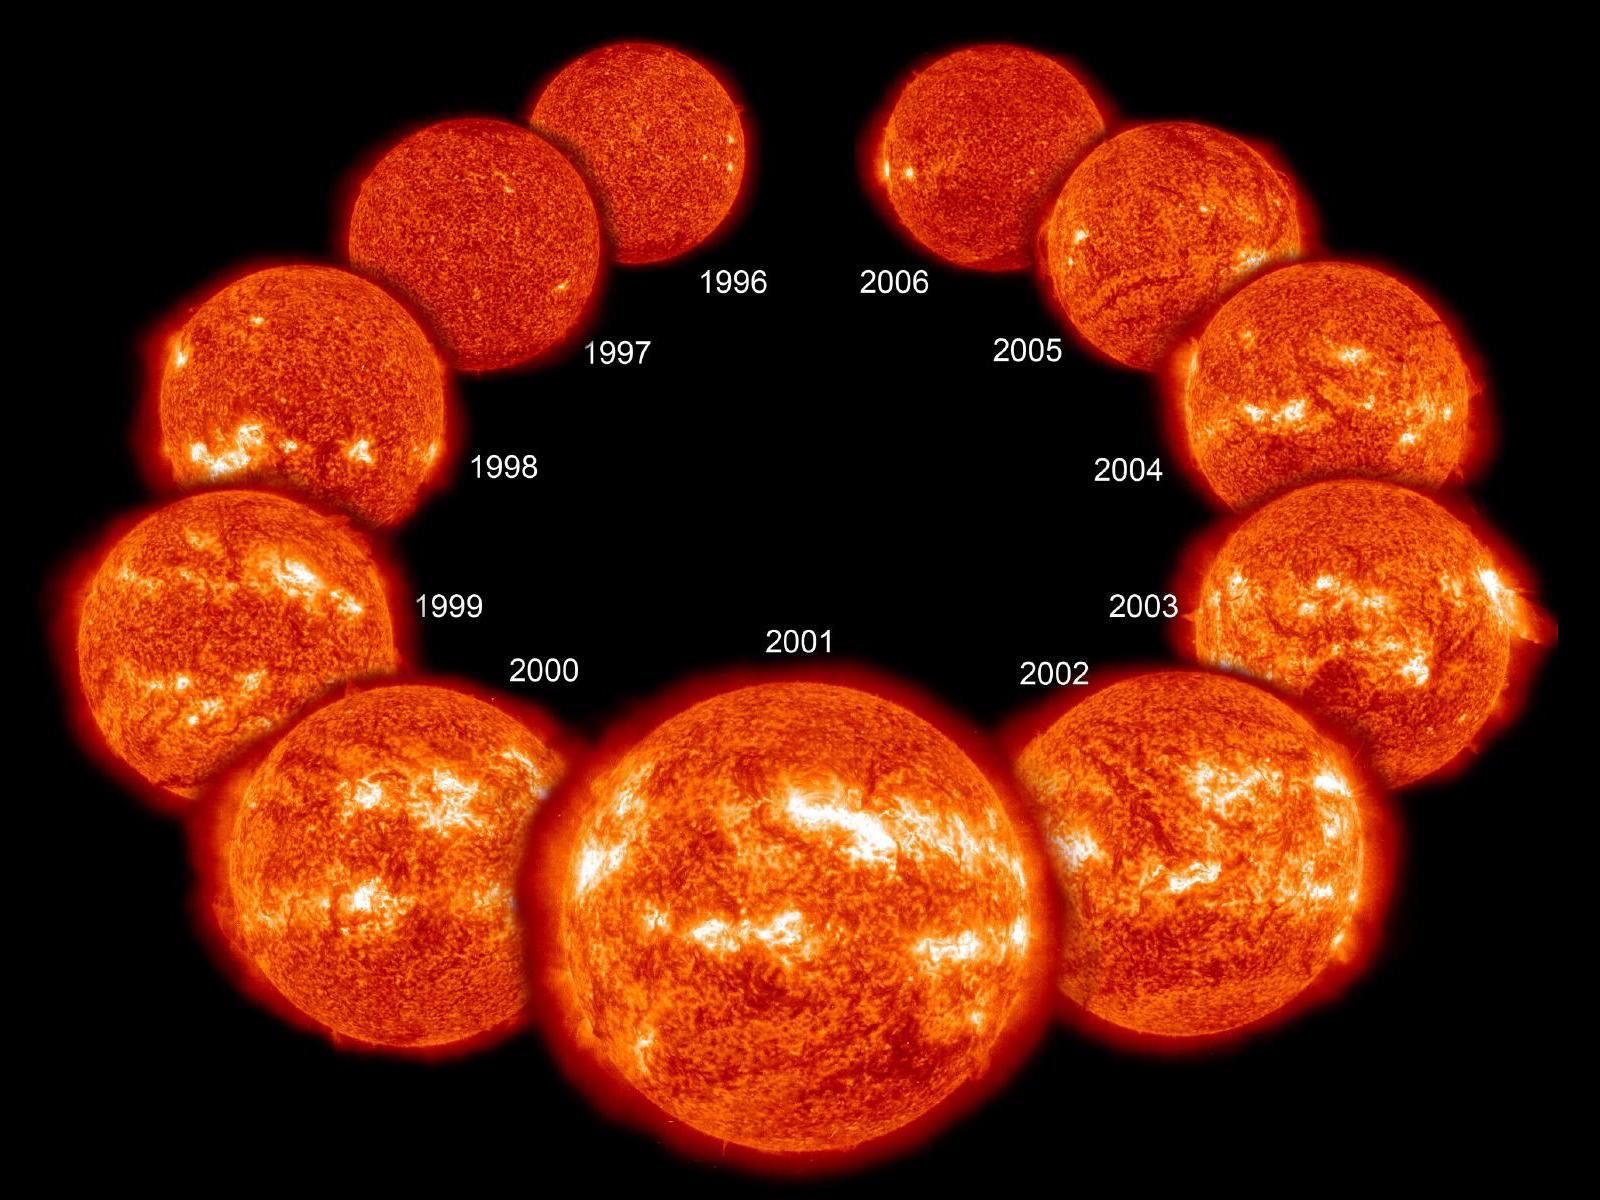
You can tell where the Sun is in its cycle by counting the sunspots. Sunspots are cooler, darker areas on the Sun’s surface. Those are the spots when the magnetic fields are really strong and actually block the heat of the Sun’s core from reaching the surface. Solar flares are intense explosions of energy that release radiation into space. They happen near sunspots when the magnetic fields cross one another.
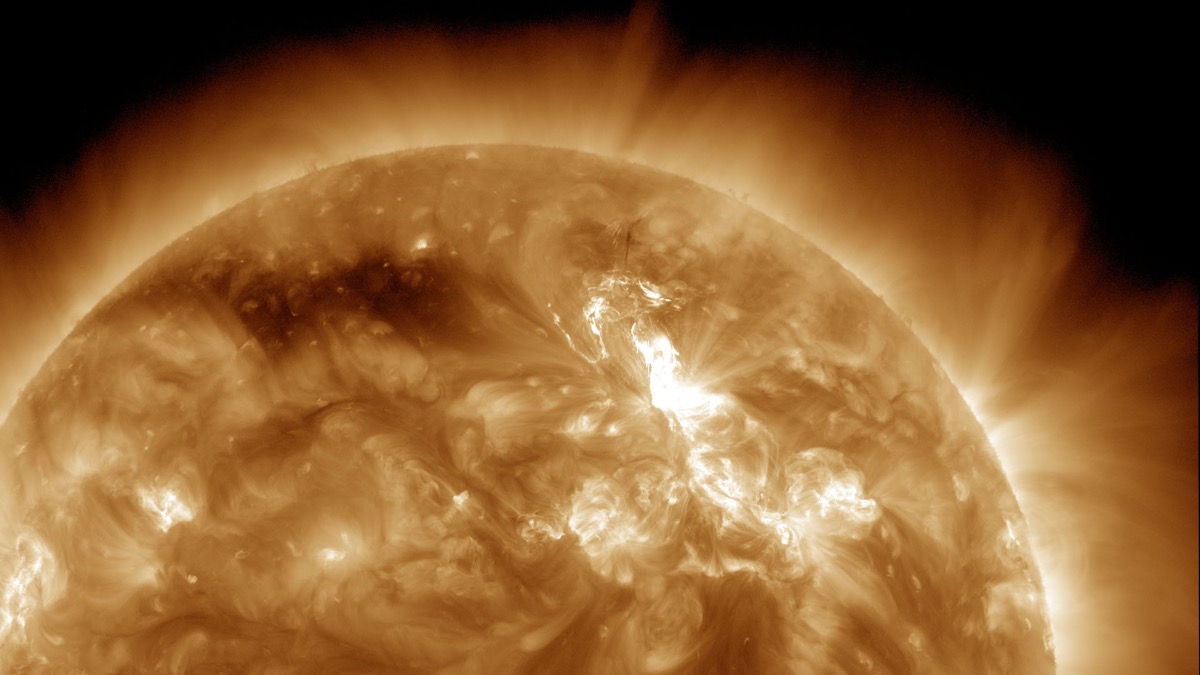
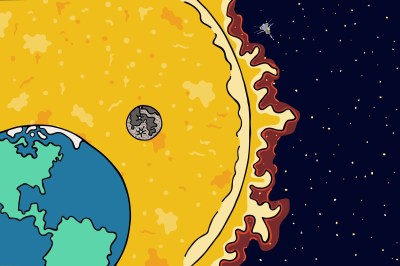
Sometimes, there are even coronal mass ejections (CME for short) which are like huge bubbles of radiation and particles from the Sun’s corona, its outermost layer. Charged particles from the corona create beautiful streamers, loops, and plumes all over the surface of the Sun. The corona also causes the solar winds that travel through our solar system and outward into space for billions of miles. The constant flow of energy and matter from the Sun creates the heliosphere, a giant bubble around the Sun and its planets.
The Sun is a dynamic, ever-changing star. Take a closer look and get to know it better by looking at what our Sun looks like today from NASA’s Solar Dynamics Observatory. Or try NASA’s interactive Helioviewer. (Never look directly at the real sun!) Then, grab your supplies and make your model!
What Lies Beneath The Outer Layers Of A Star?
Let’s Observe!
Below are pictures of the surface of the sun. Are there areas that look darker or brighter than the rest of the surface? Look for signs of sunspots, solar flares, or CMEs. Do you spot any patterns? What colors do you see? What textures do you notice? Do these pictures remind you of other things you have seen—like a roaring campfire, raindrops falling into a puddle, or steam rising over a cup of soup?
Make a list of observations. Try to come up with at least three words to describe the surface of the Sun. Get creative! You can draw some pictures as well. Scientists and engineers often sketch or take pictures while they make observations.
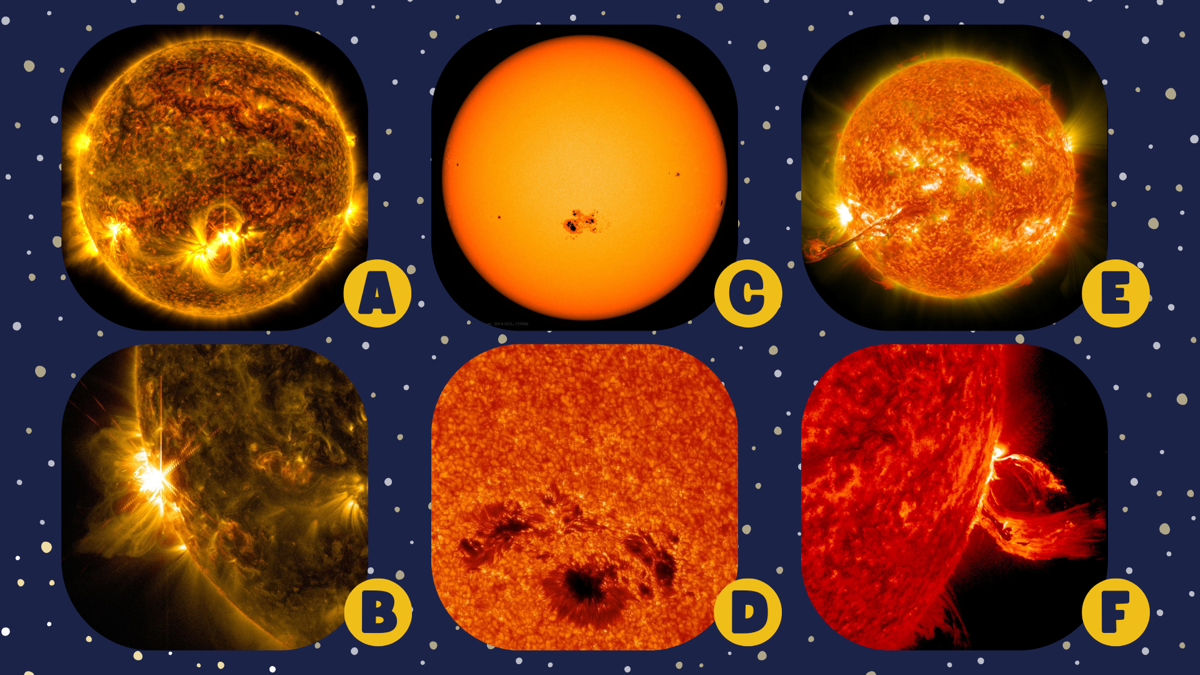
Want larger versions of these images, additional photos, or a description of what’s happening in each picture? Download this presentation or visit Goddard Space Flight Center, Solar Dynamics Observatory, or the NASA Image Gallery.
What features of the Sun are most interesting to you? For your model, do you want to make a quiet Sun at the start of the solar cycle or a spotted Sun at the peak of its activity? How will you represent the motion of gasses on the surface of the Sun?
Once you know what you want to model, it’s time to get crafty. Gather your materials!
Materials
Shaving cream (foam, not gel)
Food coloring (liquid, not gel) or liquid watercolors
Toothpicks, popsicle sticks, bamboo skewers, or chopsticks
A plate with low rim or wax paper
Copy paper (white)
Scrap cardboard, squeegee, or rubber spatula
Newspaper or tablecloth to protect your work area
Paper towels for clean up
Safety and clean-up: This activity can be messy. Food coloring can stain clothes, surfaces, and skin. Cover all surfaces. If desired, wear gloves. Keep shaving cream away from your eyes.
Making the Model
Activity 1
Practice makes perfect. Start with a basic Sun model. Once you have tried the technique, we’ll explore ways to add additional details.
- Using your rubber spatula or a piece of scrap cardboard as a squeegee, spread shaving cream on your plate or wax paper. Try to make the top flat and level. If using a plate make sure the level of the shaving cream is over the rim of the plate. Make sure the shaving cream is formed into a roughly circular shape.
- Drop about five drops of red food coloring onto the shaving cream randomly. Repeat with yellow food coloring.
- Use your toothpicks or skewers to swirl the red and yellow together.
- Gently press your paper on top of the shaving cream and food coloring. Press down lightly and wait a few seconds so that your paper absorbs the dye. The longer you let to soak, the more dye you will transfer, but the wetter your paper will be. Experiment to find the best results.
- Carefully pull the paper off of the shaving cream and lay it flat on your work surface. It may not look like much at this point, but that’s ok.
- Using your spatula, squeegee, or scrap cardboard, gently scrape the shaving cream off the paper, revealing your design. Try to do this in one swipe across the entire print. Don’t scrape too hard. You’ll risk damaging the paper. If you need to do a second pass, make sure you wipe off your squeegee. Once you’ve swiped, blot off any extra shaving cream with a paper towel.
- Let the paper dry completely before you touch it. Otherwise, it may smear.
Why does this work? Shaving cream is an emulsion of soap and oil with lots of air to make it foamy. Its soap and oil parts mostly repel water. Food coloring is mostly made of water, so it sits on top of the shaving cream and, even when you mix it, doesn’t really dissolve into the shaving cream. It’s the same thing you see when making a vinaigrette salad dressing. However, paper absorbs water very easily. So when you lay your paper on the shaving cream, the watery food coloring is wicked up and transferred to the paper to make your design.
Once it’s dry you can cut out your Sun and hang it somewhere special. To make another print, you may need to remove the top layer of colored shaving cream and add a fresh layer.
Working with a group? Download the presentation.
Activity 2
Now that you’ve had the opportunity to see how the basic printing process works, think about how you can add more scientific features to your model. Ask yourself:
- How does this model show that the surface of the Sun is fluid?
- Does my model show how the Sun’s surface moves and changes over time?
- Am I creating a model of a Sun at the solar maximum or the solar minimum?
- What’s missing from my first model? What doesn’t it show?
- What do I want to communicate with my model? How can I use my model to teach others about the Sun?
As you think about those questions, you may want to remember some features of the Sun you learned about earlier.
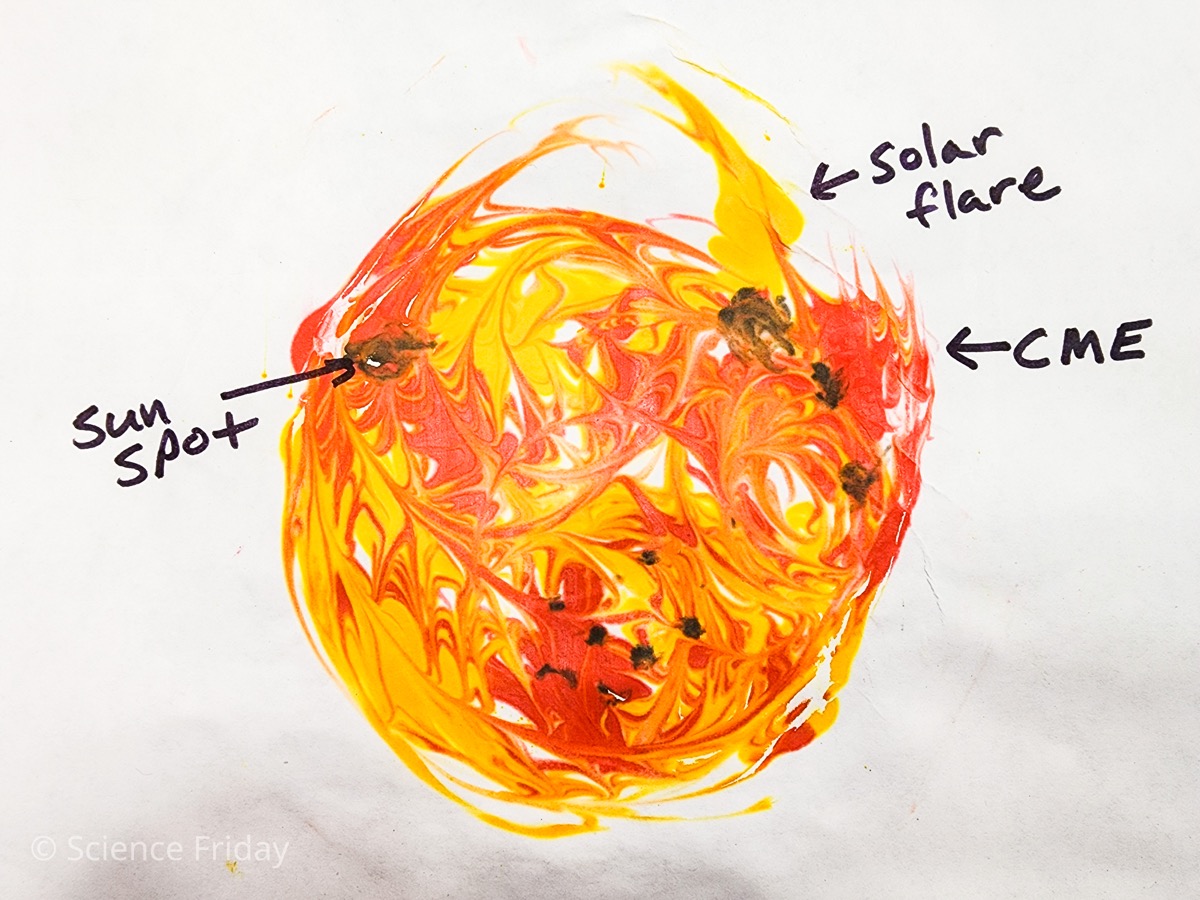
- Sunspots: Darker, cooler regions on the Sun’s surface where magnetic fields are powerful.
- Solar flares: Intense explosions of energy that release radiation into space. They happen near sunspots.
- Coronal mass ejections (CME): Large eruptions of plasma from the Sun’s corona, its outermost layer.

Once you have a plan for ways to improve upon your model, you can add more details to represent what you’ve learned. Here are some ideas.
- Mix your food dyes to make new colors. Mix red and yellow to make orange. Or mix red and green for brown. Mixing yellow, red, and blue can make black. What colors can you make? How can you use them to add sunspots and other features to your model?
- You don’t have to keep the food dye within the circle. Using your toothpick, try dragging some dye into a curve or arch away from the edge of your circle to represent a solar flare.
- Try making several prints to model the Sun’s progression through the solar cycle.
- Once the paint is dry, use markers or crayons to add additional details. Or use markers to label the features you created so that others can learn from your model.
- Try other colorants like washable paint or acrylic paint. Do powdered drink mixes like Kool-Aid work as colorants? Can you use something like soda or a sports drink instead of food coloring?
- You used shaving cream for this project. What other foaming fluids do you have at home? Would this work with whipped cream or hair mousse? Try it!
We’d love to see your Sun models! Share photos of your project with the hashtag #SciFriSunCamp or tag @SciFri on social media. Or send them directly to Science Friday using the Sun Camp photo submission form.
Keep Learning and Sharing
You have just made a 2-dimensional (or 2-D) model of the Sun. 2-D models are flat, like a map or a diagram in a book.
- How is a 2-D model different from the real Sun?
- How can you create a better model of the Sun?
Search your house for craft supplies, building blocks, clay, or other materials that you can use to create your new, more realistic model.
Our shaving cream print model from above focused on the corona, the outer layer, of the Sun.
- What do you think is inside the Sun?
- Do you think the outside of the Sun and the inside of the Sun may be different? In what ways?
- How might the Sun be similar in composition to the Earth? How might it be different?
Learn more about the Sun’s zones. Then try making a model that reflects what is inside the Sun.
Rather than using pictures, you may want to directly observe the Sun for your model. Never look directly at the sun! It can seriously hurt your eyes. Want to look at the Sun safely? You can build a solar viewer or pinhole camera. How does the image you see in a viewer differ from the photos you’ve looked at?
You can also read about the Sun to learn more. Try NASA’s free e-book, Our Very Own Star: The Sun. Or visit your local library for fun books like Sun! One in a Billion by Stacy McAnulty. If you discover a great book, make sure you share your recommendation with Science Friday. Send us an email at educate@sciencefriday.com.
Do you have questions about the sun? Register for Sun Camp to ask real scientists! Or visit sciencefriday.com/suncamp on Wednesdays, 4 pm PT / 7 pm ET to watch our live Q&A sessions.
NGSS Standards
This resource works toward the following performance expectations:
- K-2-ETS1-3: Analyze data from tests of two objects designed to solve the same problem to compare the strengths and weaknesses of how each performs.
- 1-ESS1-1: Use observations of the sun, moon, and stars to describe patterns that can be predicted.
- 2-PS1-1: Plan and conduct an investigation to describe and classify different kinds of materials by their observable properties.
- 2-PS1-2: Analyze data obtained from testing different materials to determine which materials have the properties that are best suited for an intended purpose.
- 3-5-ETS1-1: Define a simple design problem reflecting a need or a want that includes specified criteria for success and constraints on materials, time, or cost.
- 3-5-ETS1-2:Generate and compare multiple possible solutions to a problem based on how well each is likely to meet the criteria and constraints of the problem.
- 3-5-ETS1-3:Plan and carry out fair tests in which variables are controlled and failure points are considered to identify aspects of a model or prototype that can be improved.
- 4-PS3-2: Make observations to provide evidence that energy can be transferred from place to place by sound, light, heat, and electric currents.
This activity is supported by the NASA Heliophysics Activation Team (NASA HEAT), part of NASA’s Science Activation portfolio.
![]()
Credits:
Written by Sandy Roberts.
Edits by Ariel Zych.
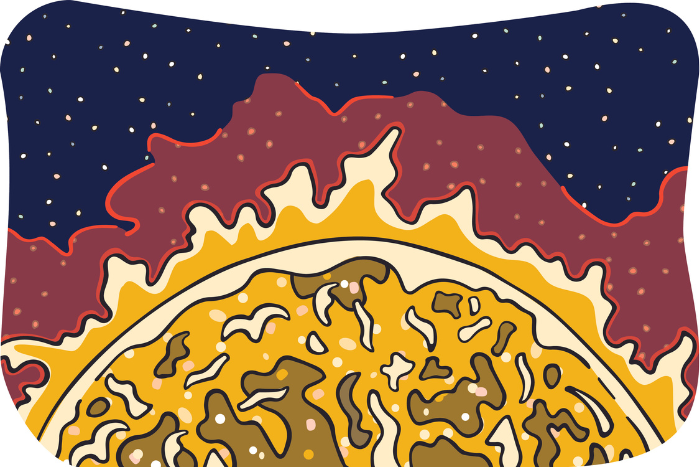
Illustration by Carrie Lapolla.
Digital Production by Sandy Roberts.
Have you registered for Sun Camp yet? Join today! You’ll get a weekly newsletter, access to interactive Q&As with real scientists, and extra resources for learning.
Meet the Writer
About Sandy Roberts
Sandy Roberts is Science Friday’s Education Program Manager, where she creates learning resources and experiences to advance STEM equity in all learning environments. Lately, she’s been playing with origami circuits and trying to perfect a gluten-free sourdough recipe.