
Grade Level
9-12
minutes
Multi-day
subject
Life Science
stem practices
Analyzing and Interpreting Data
Activity Type:
microbiology, hands-on activity
We often hear that germs are something to avoid. Wash your hands. Clean your surfaces. Stay out of the mud! But scientists are discovering that our relationship with microbes is more complicated than that. While the word “germs” typically refers to microbes that can make you sick, most microbes are harmless. Some are even beneficial!
Humans evolved in a world filled with bacteria, fungi, and other microscopic life. In fact, our bodies host trillions of microbes that make up what scientists call the microbiome. Some of these microbes help train your immune system, aid in digestion, and protect you from harmful pathogens.
A Little Grime Can Boost Kids’ Health. But What Kind?
Where else do microbes live?
Microbes live almost everywhere on Earth—on plants, animals, soil, in water, and on the objects we touch every day. In fact, soil is one of the richest microbial environments on the planet. Just a single teaspoon of soil can contain billions of bacteria, fungi, viruses, and other microscopic organisms that help break down organic material, recycle nutrients, and build healthy soil.
Scientists study these microscopic ecosystems to learn how they interact with their environments and our bodies. Some research shows that early exposure to microbes from dirt, animals, and other people may help support healthy immune system development. So let’s find out if there are microbes living on the surfaces around you, and how we can see them in action.
“Our immune systems evolved in a world that is seething with microbes. All of our ancestors got this monstrously large microbial exposure.” – Dr. Jack Gilbert, microbial ecologist
In this activity, you’ll collect samples from everyday surfaces and grow them using petri dishes loaded with a nutrient-rich mixture called agar. When a microbe lands on a plate, it multiplies and forms a visible colony. By comparing the colonies that appear on different plates, you can see how microbial growth varies between environments. However, you probably won’t be able to identify specific microbes or be able to tell if a colony is harmful or safe just by looking at it.
⚠️ Safety Notes: This activity is not meant for young children. Please follow all safety guidelines and precautions described in the procedure. Learn more about safety while performing microbiology activities.
Microbes grow incredibly fast. Under the right conditions, a single bacteria can divide every 20 to 30 minutes using a process called binary fission, allowing tiny populations to grow into millions of cells.
The Goo In Your Home Could Help Science Address Climate Change
Try This!
Materials
|
Procedure
⚠️ Safety Notes: Wear disposable gloves and eye protection while swabbing surfaces or aplates. ALWAYS wash your hands after swabbing surfaces or handling the plates.
⚠️ Safety Notes: Do not swab human or animal mouths or substances like raw meat. Consider the potential risk for infection when selecting surfaces.
⚠️ Safety Notes: NEVER open the plates after the colonies appear! After observations are complete, keep the plates sealed and place them in a sealed bag. An adult can disinfect them with a 50/50 bleach/water solution before throwing them away. If available, autoclave materials after use.
⚠️ Safety Notes: Learn more about safety while performing microbiology activities.
- Choose surfaces to swab. Good examples would be:
– Your phone, keyboard, or any other high-touch electronic device
– Doorknobs
– Desks
– Soil or grass
💡OPTIONAL: Try the “five-second rule” test: Drop a cracker or an apple slice on the floor. Leave it there for five seconds. Then swab the sample to test if it picked up microbes. - Prepare your agar plates. Label your agar plates by writing the names of the surfaces you’re testing on the bottom of the plate. (After you swab your test samples, you will be placing the plates face down so that no condensed water drips into your sample.)
- Collect your samples.
– Dip a cotton swab in sterile or distilled water. (Do not soak the swab.)
– Gently rub the cotton swab on the surface you wish to test. Twirl the swab against the surface as you make the collection rather than just brushing it across the surface. This will help make sure you get a large sample of microbes.
– Lightly run your swab in a zigzag pattern across the agar. Think of it like drawing a “Z” and then turning the plate 90 degrees and drawing a “Z” with your swab again.
– Close the plate and use masking tape to hold the top and bottom together and seal the plate. Place the plate face down in a room-temperature (68–70°F) area for 2 to 3 days. - Make observations using your worksheet.
– Record the number of visible colonies each day.
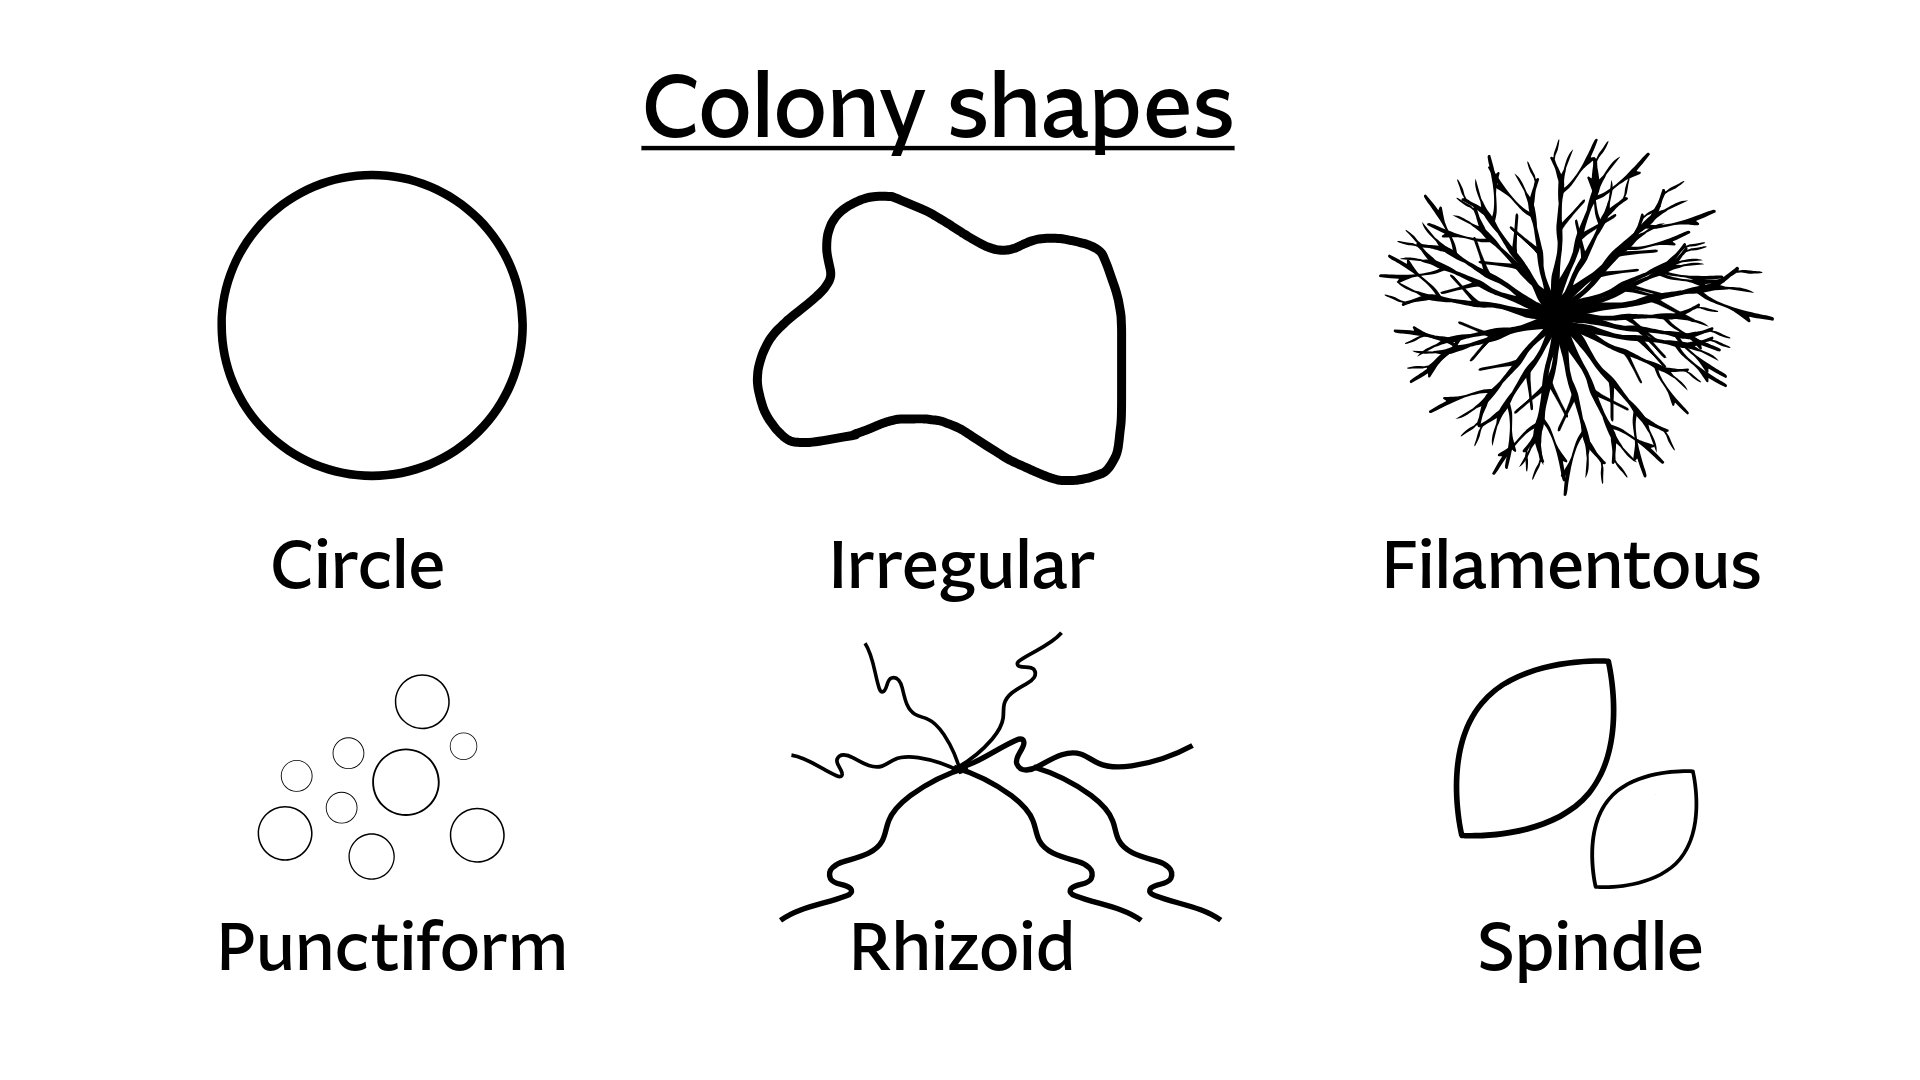
– Identify the morphology—the colors, shapes, and textures—of the colonies. (See the guide below.)
– Note any differences in the size, shape, color, or texture of colonies over time.
– Draw what you see on each plate. - Evaluate what you see.
– Which sample had the most colonies?
– Which sample had the least growth?
– Did colonies all have the same texture, or did textures vary? How or how not?
– Which environments seemed to support the most microbial life?
– Why do you think some surfaces had more microbes than others?


Use the charts below to compare the colonies you see on your agar plates.
Colony Identification Quick Guide
| What you see | Likely microbe |
|---|---|
| Smooth, round, shiny colony | Bacteria |
| Small translucent dots | Young bacterial colonies |
| Fuzzy or hairy spreading colony | Mold (fungus) |
| Dark powdery spots | Mold spores |
Ask yourself these questions:
- Did the results surprise you? Why or why not?
- Why might handwashing still be important, even if some microbes are beneficial?
- If you tested the five-second rule, does it change your opinion about eating a piece of food after it falls on the floor?
- Can you tell by looking at your colonies if any contain microbes that might be harmful?
The tiny colonies growing on your plates are just a small glimpse into the enormous microbial world that scientists are trying to understand. Your observations probably show that microbes are common in everyday environments and demonstrate the microbial biodiversity all around you. But don’t worry! Many of the microbes you grew are likely harmless environmental bacteria.


Why are scientists interested in microbes?
Scientists study microbes to understand how microscopic life shapes our world. By sampling microbes from different environments, researchers can compare microbial diversity and learn how microbial communities function in soil, water, air, and even in our own bodies. By studying our relationship with microbes, scientists can also learn how the microbes we encounter in our environment influence our immune systems and microbiomes.
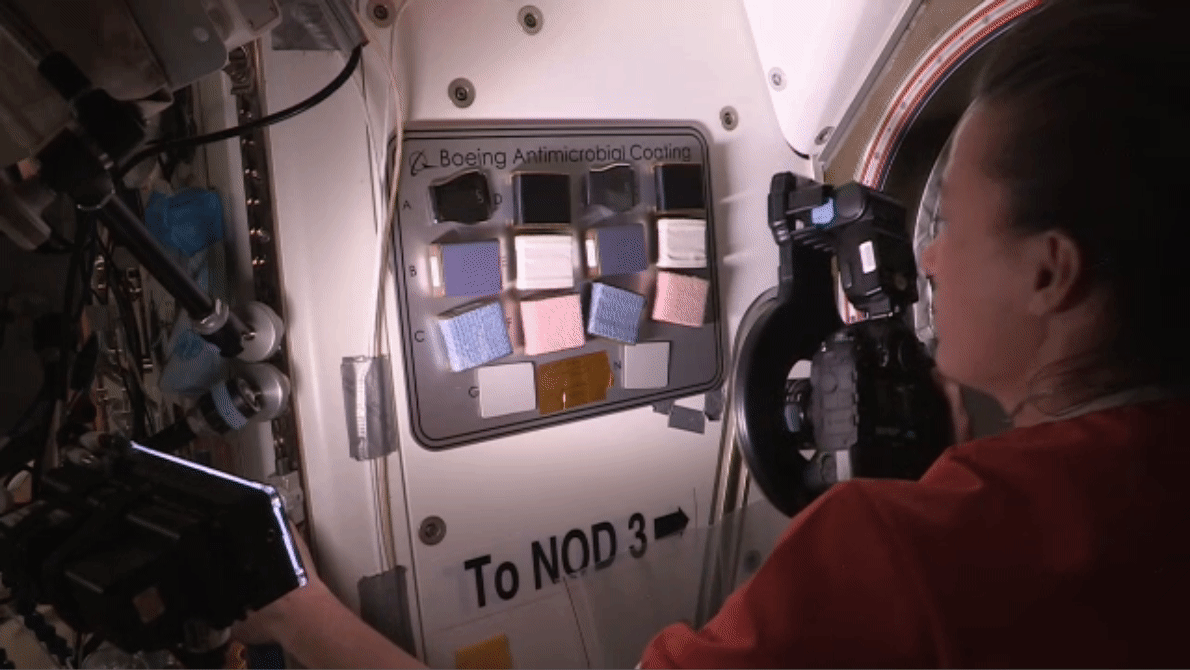
Certain microbes on Earth are already known for their incredible survival abilities. An extremophile bacteria named Deinococcus radiodurans has been nicknamed “Conan the Bacterium” after the comic book character Conan the Barbarian due to its ability to survive extreme radiation, vacuum-like conditions, and other harsh environments that would kill most living things. Scientists believe that part of its survival capability is because it has powerful DNA repair systems that can rebuild its genetic material even after severe damage.
Some scientists are exploring whether microbes could survive space travel between planets by hitching a ride on meteorites. Researchers have even tested D. radiodurans outside of the International Space Station to see how microbes survive in the harsh conditions of space. These hardy bacteria withstood extreme heat and cold, intense radiation, and massive fluctuations in pressure for three years in space!
‘Fire Amoeba’ Likes It Hot, And A Faraway Lava Planet
Keep learning (and exposing yourself to healthy microbes!)
-
A rendering of Conan the Bacterium or D. radiodurans dressed as the comic book character Conan the Barbarian. Credit: Cybele Tamulonis with images from Adobe Stock Touch grass! Get outside and garden or play in soil, walk in the park with friends, or care for animals. Interacting with your natural environment can increase microbial exposure and diversity.
- Harness the delicious power of microbes by making yogurt, sourdough bread, or pickles at home. Check out our “Stinky and Delicious” activity to learn how.
- Read “I Contain Multitudes: The Microbes Within Us and a Grander View of Life” by Ed Yong.
- Watch the “Mythbusters” episode “The Five Second Rule.”
- Listen to “Meet the Microbiologist,” a podcast by the American Society for Microbiology.
NGSS Standards
- LS1.A: Structure and Function
– MS: All living things are made up of cells, which is the smallest unit that can be said to be alive.
– HS: Systems of specialized cells within organisms help them perform the essential functions of life. - LS2.A: Interdependent Relationships in Ecosystems
– MS: Organisms and populations of organisms are dependent on their environmental interactions both with other living things and with nonliving factors. Growth of organisms and population increases are limited by access to resources.
– HS: Ecosystems have carrying capacities, which are limits to the numbers of organisms and populations they can support. These limits result from such factors as the availability of living and nonliving resources and from such challenges as predation, competition, and disease. - LS4.D: Biodiversity and Humans
– MS: Changes in biodiversity can influence humans’ resources, such as food, energy, and medicines, as well as ecosystem services that humans rely on—for example, water purification and recycling.
– HS: Humans depend on the living world for the resources and other benefits provided by biodiversity.
Get great educational resources for your classroom, home, and beyond to your inbox each month.
K-12 Education Beyond The Classroom
Credits:
Lesson by Cybele Tamulonis
Copyediting by Erica Williams
Developmental editing by Sandy Roberts
Digital production by Sandy Roberts
Educator's Toolbox
Meet the Writer
About Cybele Tamulonis
Cybele Tamulonis is a writer, apiarist, and entomology enthusiast.