Grade Level
6-12
minutes
15 min - 1 hr
subject
Engineering and Tech
Activity Type:
design challenge, metal alloy, circuits, electricity
Mini Robots Need Mini Muscles
Any robot that moves needs actuators—motors that move parts of the robot around. While robot actuators have been around since the dawn of machines, they have some issues. For one, it is very difficult to make affordable microscopic motors and therefore, it is difficult and very expensive to make tiny robotics. Robot reflexes cannot yet compete with their biological counterparts, and unlike living tissue, robots can’t usually repair themselves or grow replacement parts. For Ritu Raman and other bioengineers, these robotic weaknesses are opportunities: Why not use muscles, the motors of the body, to drive robots instead?
Raman, a post-doctoral researcher at MIT, specializes in using biological materials and tissues for engineering robots that are biohybrids—part biological materials, part synthetic. She’s used real living cells to build custom-shaped artificial muscles, used those muscles to create biological motors, and used genetic engineering to make those muscles respond to flashes of light. Naturally, the next step was to put all these elements together onto an artificial “skeleton” that moves with the help of bioengineered skeletal muscles that can be controlled by light! Oh, and that little artificial muscle robot? It’s going to need some exercise so that it can get stronger, too. Seriously.
Here’s a short video where Ritu Raman describes some of her work:
Raman and her colleagues have made biohybrid robots a part of their undergraduate coursework in bioengineering, and have even made their methods public so that anyone with the proper equipment can make their own biobots. But before you go out and try to grow artificial muscles in the lab, you might want to start with a much simpler model of how muscles work: nitinol wire.
Nitinol: A Metal That Acts Like A Muscle
Most metals will contract or expand in response to changes in temperature. But certain metal alloys (which are metals made of two or more metals combined) don’t just expand and contract, they also have the ability to return to a previous shape when heated. Called “memory alloys”, they can act like mini motors, doing work as they bend or stretch to return to their stable configuration.
One such alloy, is nitinol. Made from a nickel-titanium alloy, nitinol bends and holds its shape just like regular metal or wire, but when you heat it up, either with a flame or an electrical current that generates heat through resistance, nitinol will return to its original shape. Sold as “muscle wire” (Flexinol, a specifically pre-trained nitinol wire) or “memory wire” (Nitinol), a short length of nitinol wire can be made into a simple muscle model that can power quick movements, using just a battery and a beginner-level paper circuit. Here’s how:
Make A Memory Wire Circuit
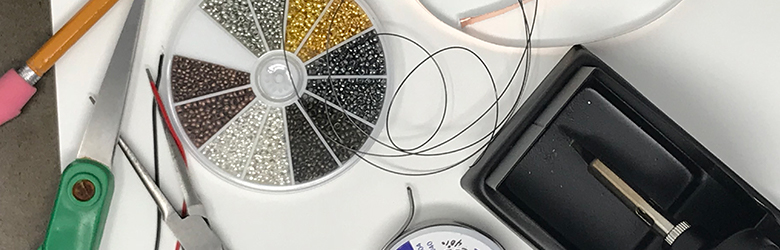
Materials:
- 6-12” heavy duty Nitinol (memory) wire or Flexinol wire, 0.02” (0.5mm) or larger gauge.
- Wire crimps
- 12” copper tape
- Cardstock
- 9V battery
- 9V battery cap with leads
- Solder (lead free if possible) and soldering iron
- Scissors
- Needle-nosed pliers, wire cutters
- Optional: needle and thread
CAUTION: SOLDERING
This activity suggests the use of solder and a soldering iron to form a circuit with multiple components. Soldering is a fun and useful skill, but proper care should be taken to avoid burns, ingestion of lead-containing solder, inhalation of fumes, and damage to work surfaces. Check out this soldering safety guide, work in a well-ventilated area, and use eye protection. That said, there are a number of ways to make a circuit without soldering, including with circuit kits like those made by LittleBits or with breadboards and jumper cables, that can be used as an alternative.
Prepare the memory wire
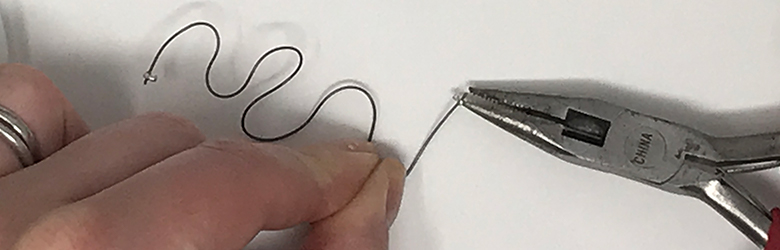
- Cut a short 4” piece of memory wire, crimp a wire crimp to each end of the memory wire and bend the wire back and forth to make it shorter. Set aside.
Sketch the circuit
- Cut a rectangle of cardstock no bigger than 6×8” and fold down one corner about one inch.
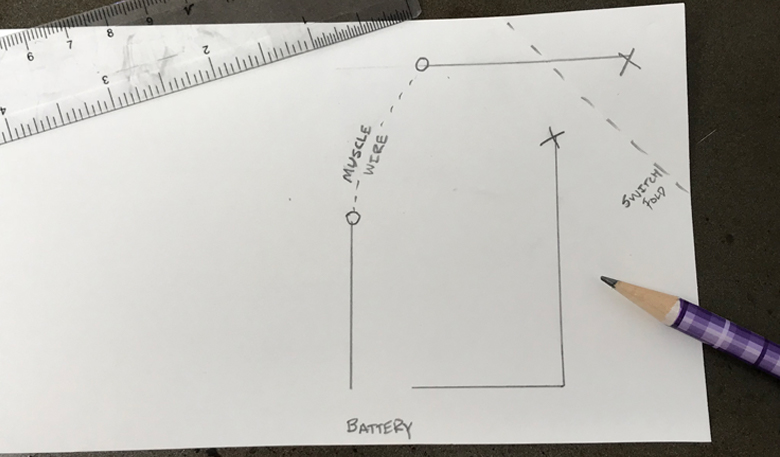
- Make an “x” on the center of the underside of the folded corner with a pencil. Then do your best to make an “x” on the paper where the “x” on the underside meets the opposite side of the paper when folded. Check to make sure that the two x’s touch one another when the flap is folded down. This will be your “switch” for activating your memory wire.
- Unfold the corner. Use a pencil and a ruler to sketch the following set of circuit paths onto your cardstock, making sure to end at the two x’s on either side of the fold crease:
Make your circuit
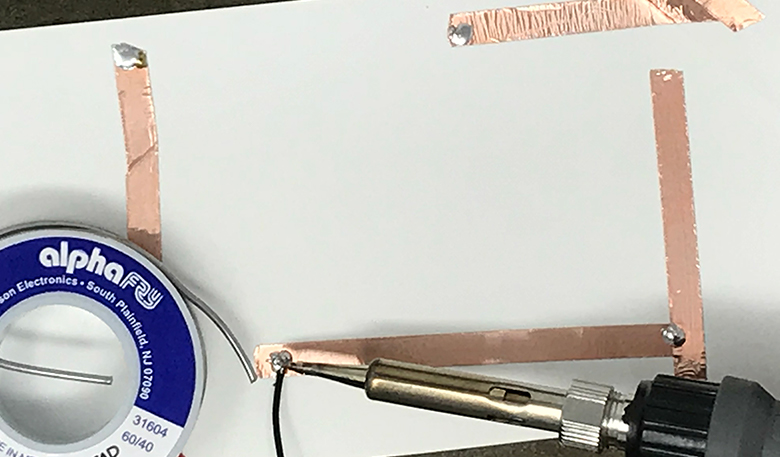
- Using your fingers to tear and separate the copper tape from its backing, apply copper tape along every line from your circuit sketch, making sure that both x’s on either side of the fold crease are covered.
- Apply a small amount of solder at every corner where two copper tape strips meet, at the end of the two sections that will connect to the battery, and at the ends that will connect to the memory wire.
- Solder the leads of the 9V battery cap to the two copper tape ends at the edge of the paper.
- Solder the wire crimp on each end of the bent memory wire to one of the remaining ends of copper wire (not the switch ends).
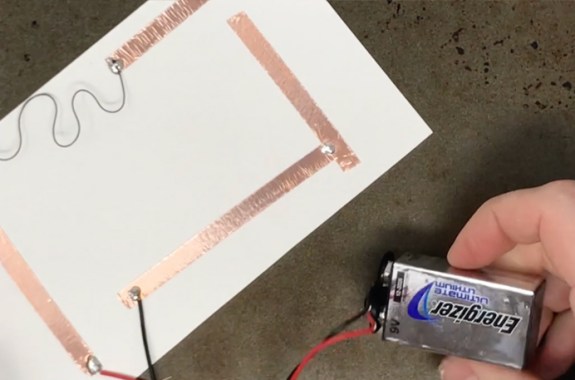
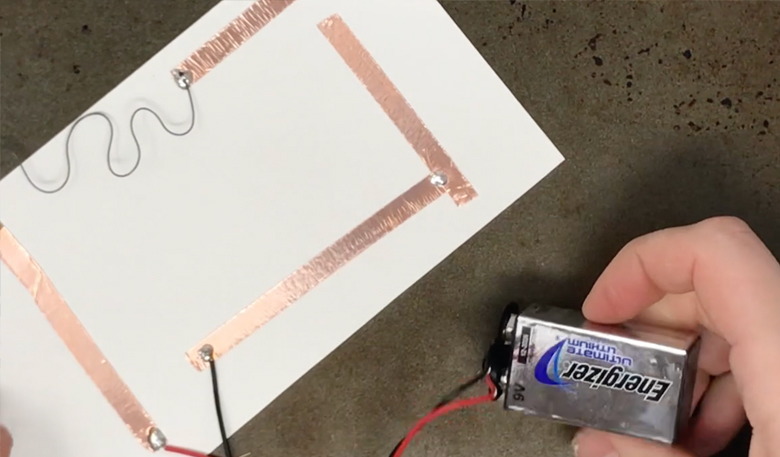
- Make sure the flap is open, then snap the 9V battery into the cap.
- Check your circuit: You should now be able to trace with your finger the path that electricity will take from one end of the battery, through the switch (when the flap is closed) through the memory wire, and back into the battery.
- Try out your memory wire
![]()
- Once your wire has returned to a smooth rounded shape, open your circuit by unfolding your switch, wait a few moments (the wire may be hot) then try bending it back into a new strange shape for another round.
Engineer Something Totally Cool
Now that you’ve got a basic circuit made that works to quickly recover the shape of a nitinol wire, try to design a memory wire circuit flexible that moves a piece of paper. You can build on the circuit you’ve already made, or use cotton button thread and a sewing needle to stitch memory wire into cardstock cutouts of leaves, animals, robots, houses, or other interesting things to make them move.
Need inspiration? Check out this project to make a crane that flaps its wings and other projects by Jie Qi.
Electronic Origami Flapping Crane w/ tutorial from Jie Qi on Vimeo.
Engineers have used the shape memory of nitinol to create devices that change shape within the body, for example to create self-expanding stents to open blocked arteries. What other applications of nitinol wire can you think of?
Meet the Writer
About Ariel Zych
@arieloquentAriel Zych was Science Friday’s director of audience. She is a former teacher and scientist who spends her free time making food, watching arthropods, and being outside.