
Grade Level
All
minutes
1-3 hours
subject
Chemistry
stem practices
Planning and Carrying Out Investigations
Activity Type:
Household materials, recycling, After School Activity, plastic
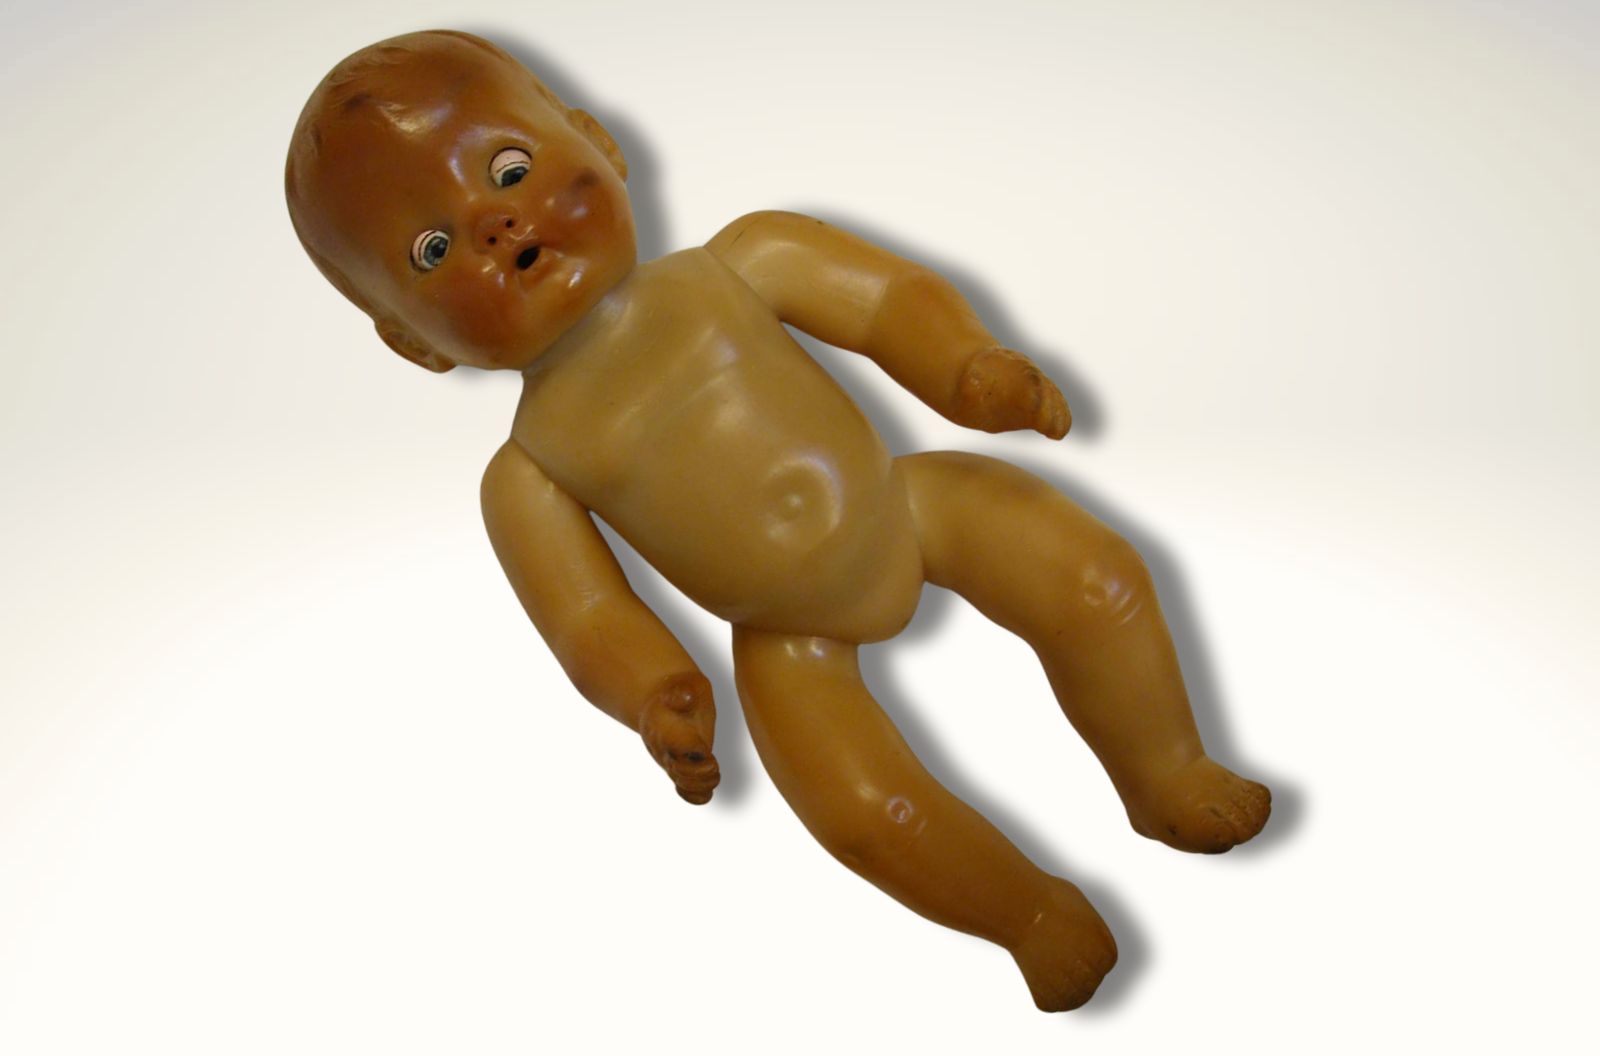
Yikes! This is a photo of a doll made in the 1970s. It was well-loved, and spent a lot of time exposed to the air and sun. What do you think happened to this doll? Have you ever seen something similar?
Make a chart like the one below. What do you notice about the doll in the picture? What do you wonder? What can you connect to this image? Think about where, when, or what you have experienced previously that relates to what you see in the photo.

Now, take some time to think about your favorite toy growing up. What made it your favorite? Do you remember when and where you got it? What was it made of? Is it still on a shelf in your bedroom or in a box in your closet, attic, or basement? If possible, get the toy and inspect it. Does it look the same as it did when you got it?
Degradation And Decomposition
The doll photo above is an example of someone’s favorite vintage doll that is now part of a collection of toys at the Museum of Denmark. It is made of PVC. PVC, or polyvinyl chloride, is a very common human-made polymer material in plastic that is used around the world. Because plastics are not naturally found in nature, they can take from 20 to 500 years to decompose or break down. How long it takes for a plastic item, like this doll, to do this depends upon what material the plastic is made of and the environment where it is located.
Before it completely decomposes, a plastic toy can discolor and show signs of degradation, or breaking down. It’s a little like the way a banana peel will become dark and mushy before no longer looking like a banana peel at all.
“The length of time that it takes for PVC to degrade or deteriorate is controlled by the environment… So if you play with your doll in a sunny window or take it to the beach with you… that speeds up the reaction…” – Yvonne Shashoua, research professor from the National Museum of Denmark
Exposure to oxygen and sunlight breaks down the molecules used to hold the plastic together. Just like your skin can get sunburned, ultraviolet (UV) radiation from sunlight can damage plastic. This process is called photodegradation.
Look at the doll again. It has had exposure to UV light. Notice that only the face, arms, and legs show signs of degradation. Why do you think that is? (Hint: This doll was wearing a dress that protected most of the surface from sunlight.)

Is The Plastic In Your Old Barbie Toxic?
Investigate Degradation From UV Light
Of course, the energy from the Sun is not only destructive. It is needed for plants to grow, to keep the Earth warm, and to make Vitamin D for your body to use. But even the more destructive qualities of sunlight can be put to creative use. This activity will show how the sun’s direct energy can interact with paper and objects and create some amazing art!
Materials:
- Black construction paper (red and green work, too) or UV light–sensitive paper, which you can buy at art stores
- Window with lots of direct sunlight or an outside spot
- Several flat, small objects such as leaves, twigs, acorn shells, small toys, etc. Use whatever you can find!
Procedure:
- Gather some objects to make art with! Small and flat objects will work best for this project.
- Arrange your objects on your paper. If you are creating this art outside, make sure you have something weighing down your artwork if the objects are light. You don’t want your items to blow away!
- Leave your art in a bright spot. If you use light-sensitive paper, the art will be done in about five to ten minutes. (Check the instructions for specific times.) If you use traditional black construction paper, it will take more time. Consider leaving it in the spot for the whole day. The sunnier the day, the quicker the art will happen! If it is a cloudy day, be patient and give the project more time.
- When the color of the exposed paper has faded, it is time to bring your artwork inside. How faded you would like your art to be is up to you!
Take a look at your paper.
- What do you observe when you take your objects off the paper?
- Why do you think there was a change in the color?
- How is this similar to the first photos of a doll, above?
So what just happened? Magic? No! The UV light in the sunlight broke down the chemical dye of the black paper, making it lighter. But the flat objects you placed on the paper blocked the UV light, keeping those areas the original color under the shape. The rest of the paper will get lighter around the object.
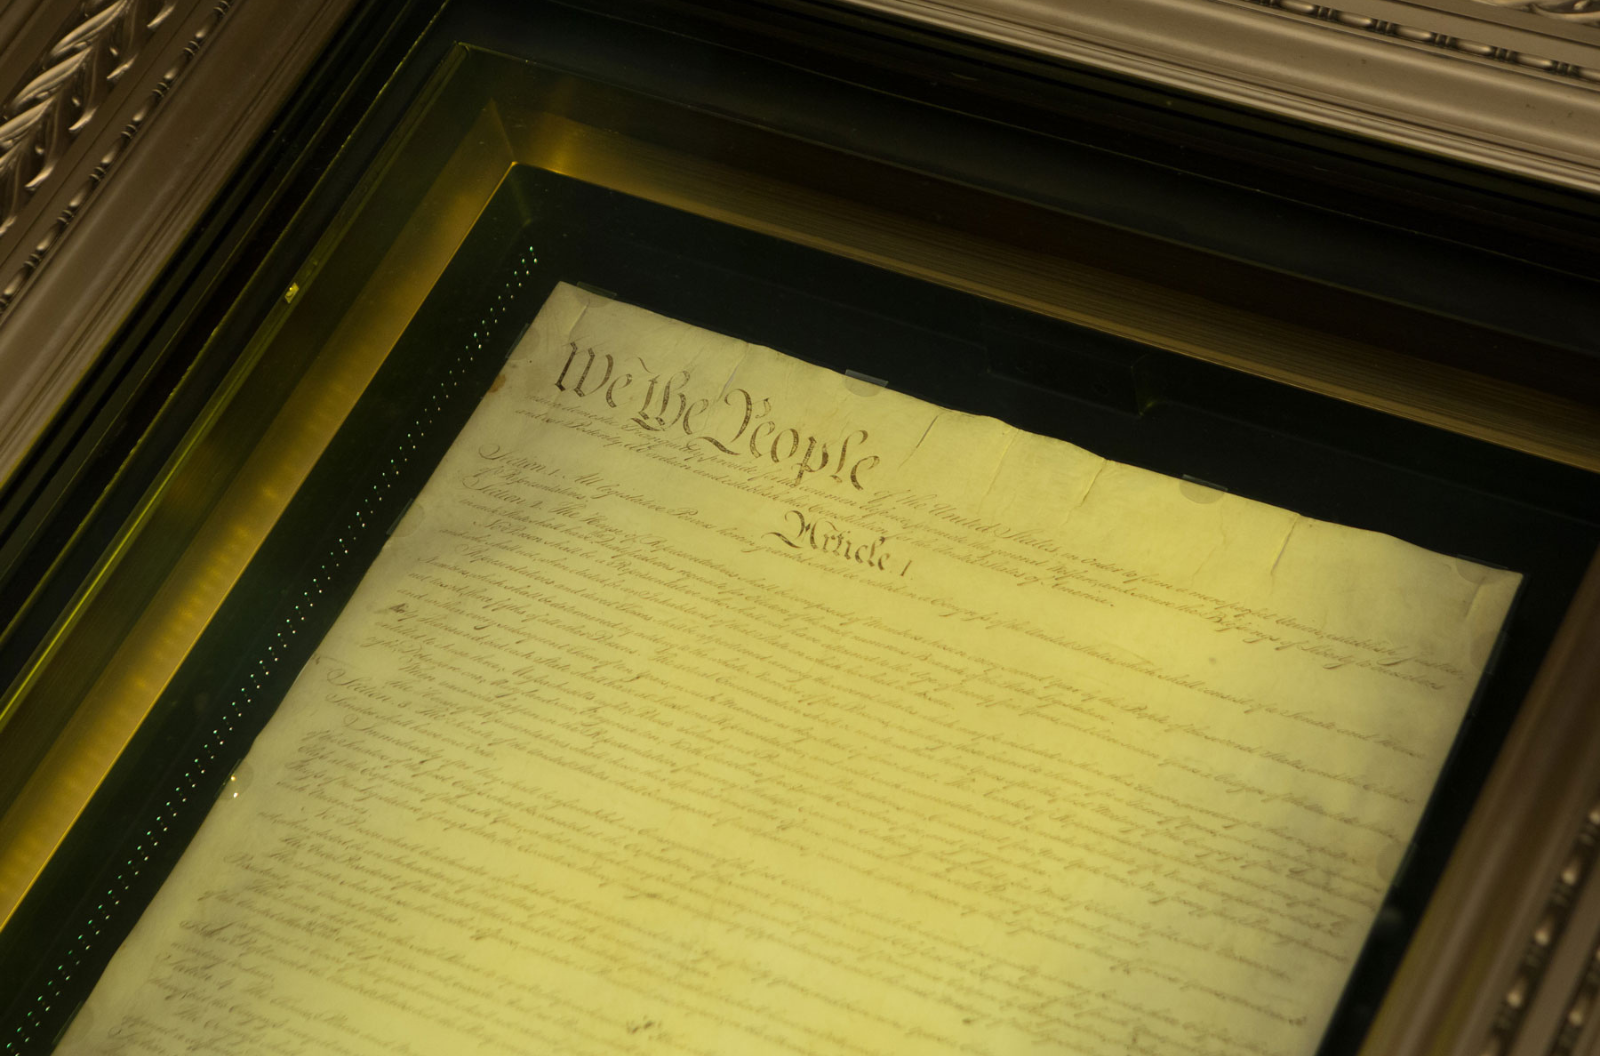
By the way, UV light doesn’t break down just plastics and the dye in construction paper. Important documents like the Declaration of Independence and the Constitution of the United States are kept in museums that use special lighting or special glass to protect these historical documents so they can be preserved for future generations. What else do you think needs to be protected from the power of UV rays?
Toys Have Changed Over Time
Toys have changed dramatically over the last 60 years and so have the materials toys are made of. Originally plastic toys, especially dolls, were made with phthalates, a substance added to plastic as a plasticizer to increase flexibility and softness. Ever wonder how your doll had such smooth cheeks? Plasticizers.
But there is a problem. Over time, the plasticizers tend to separate from the rest of the plastic. As a result, the toys get sticky and covered in phthalates. These chemicals were determined to be toxic or poisonous if ingested or swallowed. That was particularly dangerous in toys made for younger kids, like babies and toddlers, because, as you may know, babies like to put everything in their mouths. So in recent decades, the US has outlawed many types of phthalates in toys and children’s products.
However, that doesn’t mean phthalates are gone from plastics. They are still commonly used in a wide variety of containers, including those used for food. Food is also exposed to phthalates through plastic used in processing, like PVC tubing, conveyor belts, and even disposable gloves. Though the FDA does not consider this to be dangerous, many people are concerned because phthalates can leach out of the containers and into food. Researchers are continuing to study potential risks, but there are some easy things you can do to limit your exposure.
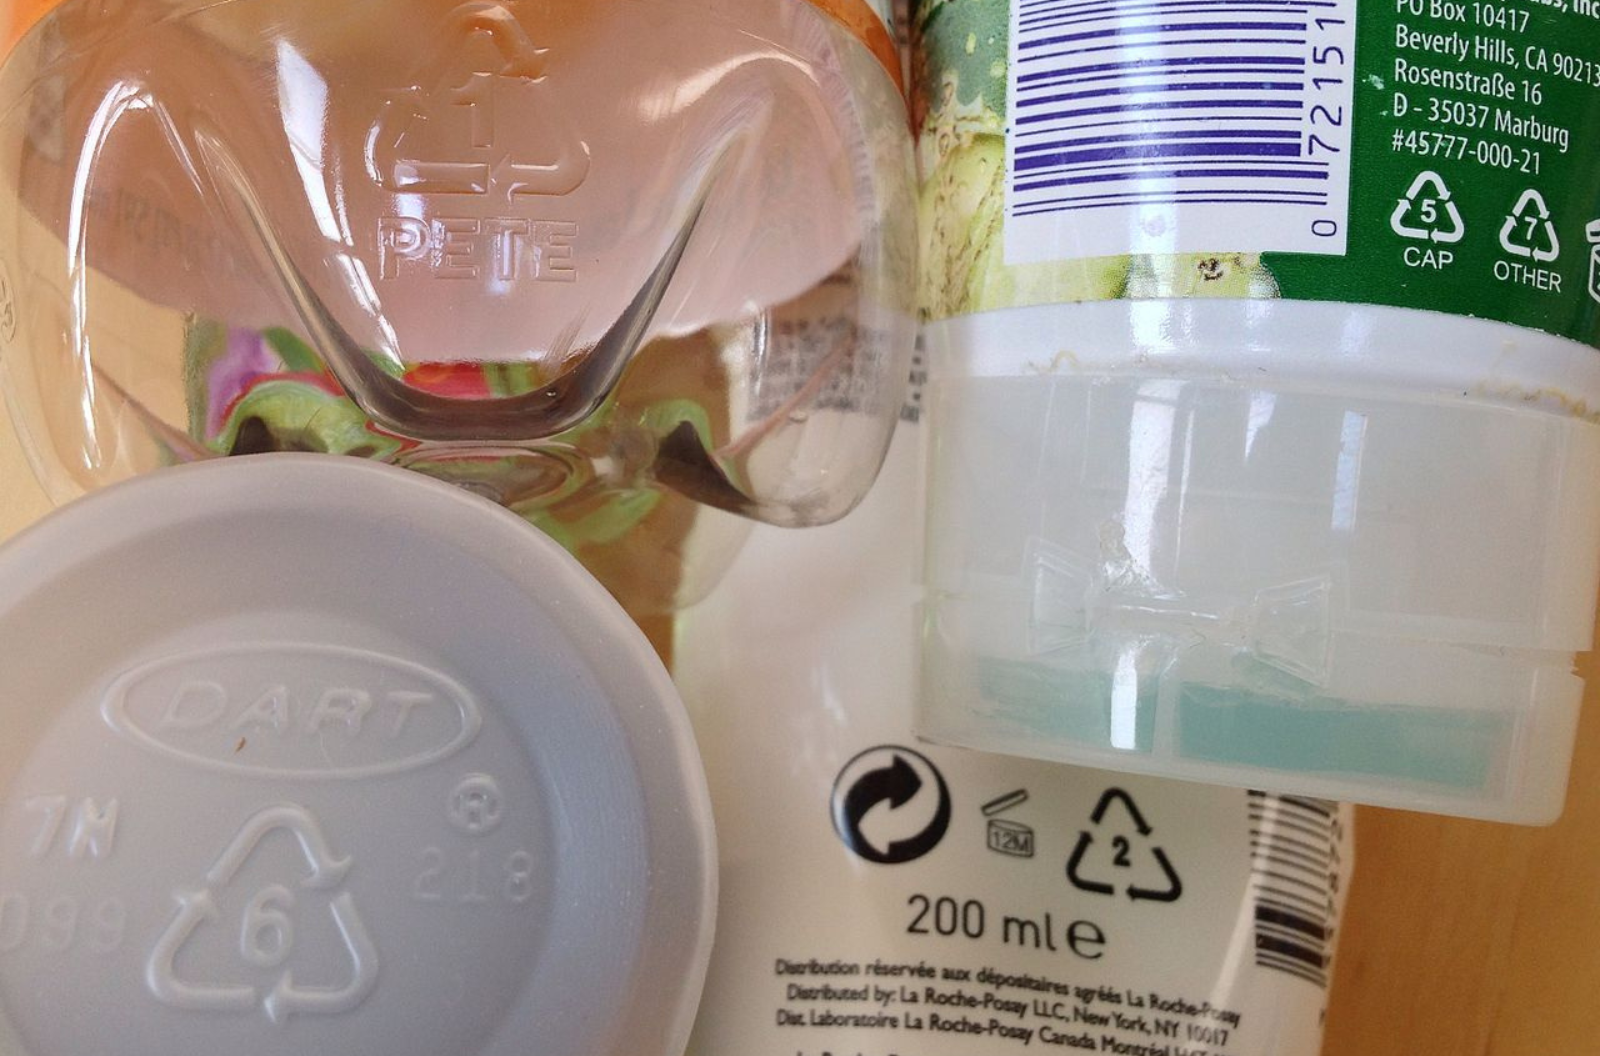
You can avoid phthalates by using glass, stainless steel, or ceramic containers for food storage. Also, check plastic containers to see if they contain phthalates. All plastic containers have a food-grade rating from 1 to 7 on the bottom. Containers with the number 3 contain phthalates, so you may want to avoid them for food. Because of consumer concerns, these plastics aren’t commonly used for food anymore, but if you have older containers, it’s easy to check and recycle them if needed.
As you discovered above, plastics can break down over time, especially when exposed to UV light. Heat from the microwave or dishwasher can also cause plastics to break down. So, if you use any plastic for food, it’s a good idea to avoid heat and sunlight, as well as old, discolored, or scratched containers.
Why Is Solving The Plastic Problem So Hard?
Preserving Toy History
Toys are safer now, but what about vintage toys that people still love? For example, Mattel started making the famous Barbie doll in 1959. Barbie dolls became the most iconic and famous dolls of the time and are considered important in their historical and cultural significance.
Unfortunately, the material in the early Barbies has been shown to degrade from UV rays and release toxins. So how do we preserve and share dolls like the original Barbie with future generations of children? One way to preserve the history of items is through museum exhibits, just like we do for important historical documents. In museum exhibits, dolls like Barbie are kept at low temperatures, even freezing them, to slow down the degradation process.
But you don’t have to be a museum to keep your special toys safe. You can protect your favorite plastic toys by keeping them in a drawer or closet until you are ready to play with them. To protect older toys, like dolls or trains passed down through family, you may want to keep them somewhere dark and cool so that they last a long time. Now that you know the science, you can be a toy preservationist too.
Want To Learn Even More?
- Listen to the entire interview with Yvonne Shashoua, “Is The Plastic In Your Old Barbie Toxic?”
- Consider recycling your old Barbies and other toys through Mattel PlayBack.
- Read a book on plastic pollution and how to reduce its impact.
- Discover about an artist who uses the sun to create beautiful art!
- Make your own bioplastic using engineering design to control the amount of plasticizer.
NGSS Standards
- MS-PS1-3. Gather and make sense of information to describe that synthetic materials come from natural resources and impact society.
Credits:
Lesson by Svea Anderson
Developmental Editing by Sandy Roberts
Copyediting by Erica Williams
Digital Production by Sandy Roberts
Educator's Toolbox
Meet the Writer
About Svea Anderson
Svea Anderson is a twenty-year veteran educator who embraces challenges and consistently seeks opportunities for new learning.