Grade Level
7-12
minutes
3 hours
subject
General Science
stem practices
Analyzing and Interpreting Data, Constructing Explanations and Designing Solutions, Planning and Carrying Out Investigations
Activity Type:
experimental design, engineering, Physical Science, food science
How quickly will an ice cream sandwich melt? Well, that depends on a lot of factors, including the weather. A few years ago, Walmart started selling an ice cream sandwich that did not melt, even when it was left outside in the sun for an hour on a 100-degree day. Someone even put one of the Walmart ice cream sandwiches on a grill and it didn’t melt for 10 minutes!
Why didn’t the Walmart ice cream melt? Pretty strange, right? Why does it seem like different ice creams melt differently?
Some may think a melt-resistant ice cream is a scientific achievement, especially if they prefer a firmer, longer-lasting ice cream. Others may prefer a softer, meltier ice cream experience. What do you like in a frozen treat?
In this activity, you’ll design your perfect ice cream. To do this, you’ll take on the role of a food scientist and engineer, using experimental design to test the melting rate of different batches of ice cream, each with slightly different mixtures. Then, you’ll perfect your ice cream recipe to engineer your ideal ice cream experience. We’ll use the engineering and design process to guide our work.
 This resource was created as part of the Science Friday Educator Collaborative.
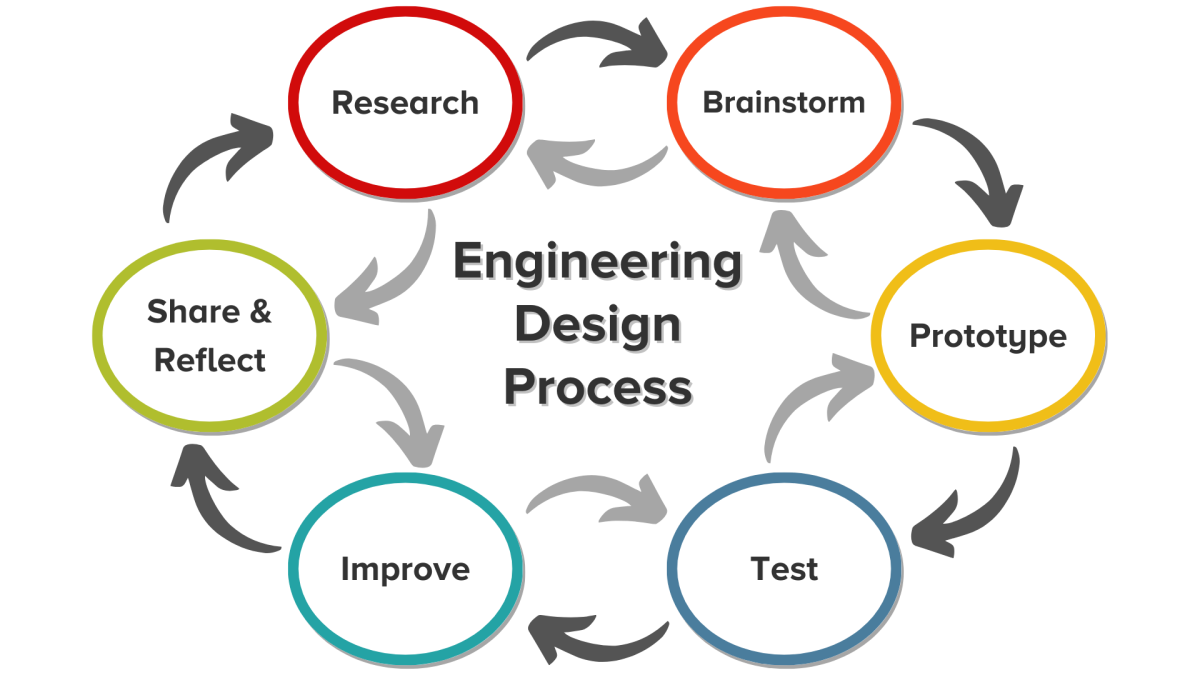
The Engineering Design Process
You’ll use the engineering design process to create a few batches of ice cream, each with different melting speeds. Then, you’ll perfect your recipe to achieve your ideal ice cream experience. Research, testing, and more testing are at the heart of food engineering.
Even in a food as seemingly simple as ice cream, there are several variables that can have a big effect on the final product: quantity and quality of ingredients, timing and temperatures, and more. How do we know what variables to adjust, how much to adjust, and what kind of impact those changes will have on our ice cream?
To understand all these variables, and to test them in a scientific way, food engineers apply the engineering design process. The first step in that process is research.
Activity 1: Research The Science Of Ice Cream
Ice cream is super cool (get it?)! Think about all the different ice creams you’ve eaten in your life. Flavors aside, how were they different? How were they the same? Can you recall some that melted faster than others?
These kinds of observations may be all you know about ice cream at the moment; with research, food engineers start to fill in the gap between observing that different ice creams melt at different rates, and being able to create an ice cream that melts in a specific way. Through research, you can familiarize yourself with background knowledge, ideas, problems and solutions that already exist. This saves you time in the future, and may even shape what and how you test.
For our activity, we’ll need to understand what ice cream is made of, how it’s made, and how its components can be changed to alter its properties. Let’s take a look at a couple of resources and answer some key questions about each, listed below and in the “Research” section of the Resource Handout.

Listen to the first six minutes of this Science Friday segment, Total Meltdown: The Rate of Ice Cream Collapse.
- What are the basic steps to make ice cream?
- What are the ingredients in ice cream?
- What are the parts of ice cream’s chemical structure?
- What are some things that affect melting rate? What is something free we can add to ice cream to change how fast it melts? How do scientists change how ice cream melts?
- What is overrun? What does having a big overrun cause?
- Do ice creams with more air cost more or less?
- Why is it important to use the same size of scoops when conducting your experiment?
Watch How Science Affects Your Ice Cream.
- What did you learn about the process of making ice cream from this video? What affects the rate of melt?
- What determines the consistency of the ice cream? How do ice crystals affect consistency?
- Ice cream is a mixture of what two things?
- What do the water and fats want to do naturally? How do you make sure the water and fat mix?
- What is another way of preventing your ice cream from melting faster?
Read the “Air is Important” and “Sugar and Fat” sections of this American Chemistry Society article, Ice, Cream …and Chemistry.
- What did you learn about the process of making ice cream from this reading? What affects the rate of melt?
- Questions for “Air is Important”
– What ice cream ingredient do most people not see or know about?
– What percentage of the volume of ice cream does air make up?
– What is the amount of air added to an ice cream called? How does it affect the ice cream?
– Ice cream is an emulsion. Explain what an emulsion is.
– What two liquids are mixed together to make ice cream? - Questions for “Sugars and Fats”
– What is the purpose of sugar in ice cream? What is the purpose of fat in ice cream?
– What is the problem with using fat as an ingredient?
– Why don’t fat and water like to mix? How can you prevent the fat and water mixture from separating?
– What is an emulsifier and how does it work? What is the emulsifier in basic ice cream?
Brainstorm Based On What You Have Learned
Discuss what you have learned with others. Compare the information from the three resources you used for your research. Did you notice any commonalities? What were the most important ingredients or techniques that affects the ice cream?
Putting together everything from your research, here are a couple of key facts you’ll want to keep in mind for the next activities:
- Ice cream is a special kind of substance because it is a combination of things that usually don’t stay mixed together—milk, fat, water, and air. This is called an emulsion.
- Emulsifiers, such as lecithin, allow the fat and ice to stay mixed together longer.
- The amount of air injected into ice cream plays a role in how fast it melts.
- Air and stabilizers are examples of variables that, as you adjust them, change the finished ice cream.
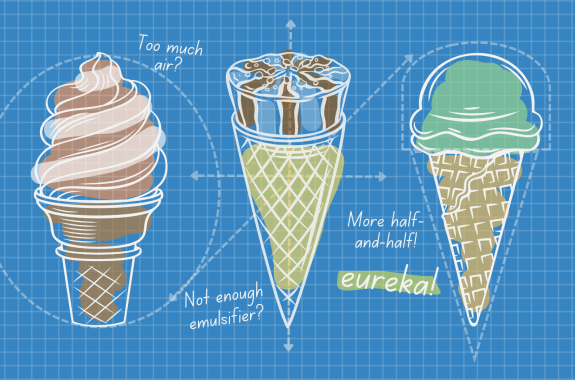
So, if you plan to make your own ice cream, how will you know which ingredients to adjust? Your research can get you part of the way to that answer, but what you’ll need to figure out how much to adjust the ingredients to get the results you want? You’ll do that by prototyping your ice cream and testing how it melts.
Total Meltdown: The Rate of Ice Cream Collapse
Materials
- 1 10 mL graduated cylinder
Note: If you do not have access to a graduated cylinder, also gather these materials:
– Tall glass
– Teaspoon
– Water
– Dry erase or washable marker - 1 funnel (how to make a homemade funnel)
- Materials for at least 1 batch of ice cream
Note: You will need additional materials for each test of a new recipe.
– ½ cup of half-and-half
– 1 tablespoon of sugar
– ¼ teaspoon of vanilla
– 1 sandwich plastic zipper bag
– 1 gallon plastic zipper bag
– 3 cups of ice
– ⅓ cup rock salt
– 1 roll of paper towels
– Measuring cup
– 1 lb coffee can (optional) - Stopwatch
- Ice cream scoop
- Drinking straws
- Tapioca flour (optional)
Safety Note: Check for dairy allergies before beginning the experiment.
Activity 2: Prototype And Test A Basic Ice Cream Recipe
How do we determine what a fast melt and slow melt look like? What do we compare our ice cream to that will help us gauge whether the ice cream is melting quickly or slowly? For that, you will need to make a batch of “baseline” ice cream that is fairly average, like a tub of vanilla you’d pick up at the grocery store. This will serve as the baseline batch in your tests. Baseline data is data that is measured before anything has been adjusted, and it allows you to compare data before and after any changes you make.
With your baseline batch of ice cream, you’ll collect data on how fast it melts. Based on the differences you see between the baseline batch data and the data from your experimental batches, you’ll be able to see how your changes to the ice cream recipe affected the rate of melt.
Make Your Batch Of Baseline Ice Cream
To begin, copy down the recipe in the “Baseline Recipe” section of the Resource Handout from the slides below.
Procedure
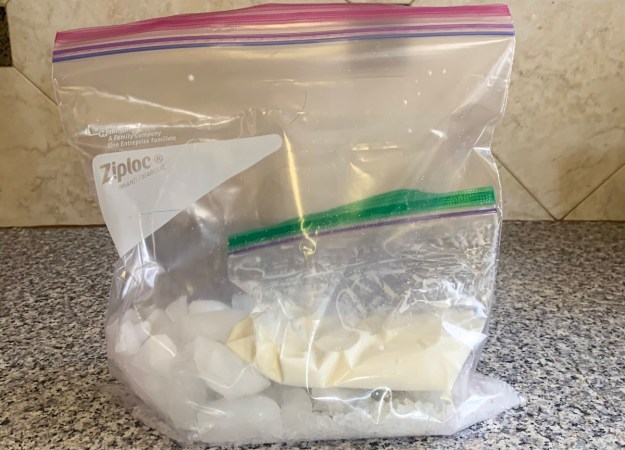
- Place ½ cup of half-and-half, 1 tablespoon of sugar, ¼ teaspoon of vanilla in the plastic zipper bag.
- Squeeze out as much air as possible and seal tightly. Make sure there are no leaks before moving onto the next step.
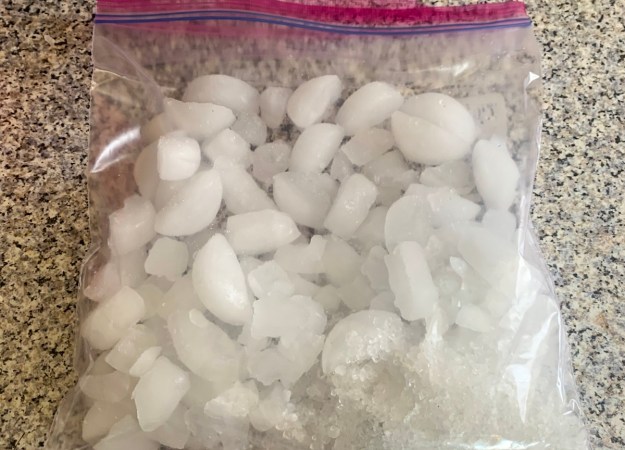
- Place 3 cups of ice and ⅓ cup of rock salt in the gallon plastic zipper bag.
- Place the sandwich bag inside the gallon bag and wrap the gallon bag in paper towels to protect from the cold.
- Shake the bag until ice cream is hardened. This will take roughly 15-20 minutes. Note: You may also place the bag in a 1 lb coffee can and roll the can on the floor.


Measure The Melt Rate Of Ice Cream
You will now collect data about how fast your baseline batch melts, which will give you a way to understand how fast or slow your experimental batches melt. Record your data in the “Collecting Baseline Data” section of the Resource Handout.
Procedure
- Place a funnel on top of a 10 mL graduated cylinder.*
- Place one scoop of ice cream on the funnel (about ½ cup or 2 oz).
- Start the stopwatch.
- When the melted ice cream has filled the graduated cylinder to the 5 mL mark, stop the watch.
- In the “Collecting Baseline Data” section of the Resource Handout, record how long it took for 5 mL (1 teaspoon) of ice cream to melt.
- If you are working on your own, you may want to repeat this test a few times to make sure your results are consistent.
*If using the tall glass instead of the graduated cylinder, before you set up the funnel, measure 1 teaspoon of water and pour it into the glass. Take your marker and mark the side of the glass at the level of the water. Since 1 teaspoon of water is about equal to 5 mL, you have just marked 5mL on your glass. Next, dump out the water, dry the inside of the glass, and set up your funnel.
Reflection Questions
- In your opinion, did the ice cream melt slowly or quickly?
- What are some changes you can implement—AKA, variables—to make the ice cream melt faster or slower?
- Did you notice differences between this recipe and what you learned about ice cream in your research?
Activity 3: Improve The Ice Cream Recipe
Now the kitchen is yours! Do you like your ice cream to melt fast or slow? It’s time to create a recipe using as much or as little of any base ingredient. As you develop your recipe, carefully consider the results you want and adjust the recipe accordingly.
Think back to your research and the ice cream you just made.
- What went into the mixture?
- Which of those ingredients do you think will impact meltiness?
- Which do you think affects the melt the most?
- Based on your research, is there anything you can add to affect how fast ice cream melts.
Plan Your Variables For Your Ice Cream Recipe
Before you get brain freeze thinking about all the ingredients that could change an ice cream’s melting point, let’s take a minute to review the different kinds of variables we are working with to make sure we’re focusing on the right ones:
- The independent variable is the thing in the experiment you will change. That could be any of the ingredients in your ice cream recipe. It is best to only change one independent variable at a time to avoid confusing which variable is responsible for changes in your experiment
- The dependent variable is the item that will be measured and will change depending on the independent variable, in this case, how fast the ice cream melts.
- The control variables are all the other things that might change the dependent variable but that are not under investigation. These control variables need to stay the same for every trial or experiment, so that you can clearly tell how the independent variable is affecting the outcome. Your control variables could be the environmental temperature, the size of the ice cream sample, and all the rest of the ingredient amounts.
To keep things simple, let’s focus on two easy to change independent variables for an ice cream recipe: the amount of air and the presence of a stabilizer. These variables affect the size of the ice crystals in ice cream. The size of the ice crystals affects the creamy texture of the ice cream and how fast it melts. Changing one of these variables will change your ice cream overall.
Test Your Variables To Find The Meltiest Melter
Select one variable to change and decide how much you will adjust it. Write out your experimental ice cream recipe and the reasoning for your recipe changes in the Resource Handout. Hint: the reasoning behind your recipe changes should be based on the results of your research and your baseline trials.
Follow the procedure you used to make your baseline batch, changing only one variable at a time. For example, you might change the amount of air in the bag when you make your ice cream, but then you wouldn’t want to add stabilizer for that batch, because doing so would make it difficult to determine whether changes in your final ice cream were the result of the air, or the stabilizer. As you create your batches, you want to keep all the control variables the same (starting temperature, size of scoop, environmental temperature, etc).
Helpful Tip: To adjust the amount of air, insert the straw into the Ziplock sandwich bag. Close the bag around the straw. Suck out or blow in air to change how much air is in the bag. Then remove the straw and seal the bag.

Using the same procedure you used for your baseline batch of ice cream, test your new ice cream recipe. In the “Data Collection for Experimental Trials” section of the Resource Handout, record how long it takes for 5 mL (1 teaspoon) of ice cream to melt.
Share And Reflect On Your Findings
Look at the results from your baseline and experimental batches. Compare them with others, if possible. For this experiment, define “melts fast” as any batch that melts one minute faster than the baseline batch; define “melts slow” as any batch that melts one minute slower than the baseline batch.
- What were the amounts of air or stabilizer in the fastest melting batch?
- What were the amounts of air or stabilizer in the slowest melting batch?
Don’t forget to test the most important aspect of your ice cream! How did it taste?
Keep Iterating
Iteration is the repetition of a process in order to generate more outcomes. Keep iterating with new batches of ice cream, changing variables as you go. Now that you’ve had some practice as a food engineer, check out these other ways to learn more:
- Since you know the size of the ice cream scoop you used in each melting trial, you can plot out the relationship between the volume of ice cream and how long it takes to melt.
- What was the percent difference in melting rate between the baseline ice cream and your new designs?
- Think about how human errors might have affected your experimental design, and how to prevent them in future experiments.
- Consider more conditions and variables. For example, add more stabilizers, change the type of sweetener, or vary the amount of fat. Would skim milk work as well as half-and-half?
- Add fruit chunks, chocolate or strawberry syrup, or any other ingredient you can think of. Does it change the melt time? How?
- How could you test two independent variables at a time? Explore factorial experimental design to learn how scientists and engineers do so.
Food Failures: The Scoop On Perfecting Your Ice Cream And Frozen Desserts
The Wide World Of Food Engineering
Food engineers are behind for all sorts of food we find on our grocery store shelves. So the next time you wonder why your cereal crackles in milk, or how that potato chip flavor came to be, imagine a food engineer at work, researching, testing and collecting data until they can create the perfect crunch, snap, melt, or tingle for your tongue. And the next time it’s your turn to cook a meal, think about how you could adjust a few independent variables to make the dish your own! You are already well on your way to becoming a food engineer yourself.
Next Generation Science Standards
This resource works toward the following performance expectations:
- MS-ETS1-3: Analyze data from tests to determine similarities and differences among several design solutions to identify the best characteristics of each that can be combined into a new solution to better meet the criteria for success.
- MS-ETS1-4: Develop a model to generate data for iterative testing and modification of a proposed object, tool, or process such that an optimal design can be achieved.
- HS-ETS1-2: Design a solution to a complex real-world problem by breaking it down into smaller, more manageable problems that can be solved through engineering.
Credits:
Written by Sergio Estrada
Draft Development by Xochitl Garcia and Sandy Roberts
Copyedits by Ariel Zych and Abigail Holstein
Reviews by Jose Rivas and Stacey George
Digital production by Xochitl Garcia and Sandy Roberts
Educator's Toolbox
Meet the Writer

About Sergio Estrada
@MrEstrada_RHSSergio Estrada is a physics and engineering teacher in El Paso, Texas, and a Science Friday Educator Collaborator. He teaches using a signature blend of real-world phenomena, applied physics, and enthusiasm. He hopes to inspire his students to change the world by learning how it works.